



General Settings
The General Settings lets you configure the core behavior of your affiliate program. In addition to providing a great level of flexibility, AffiliatePress offers a wide range of setting options. These options include affiliate registration, referral tracking, affiliate URLs, currency, account pages, security integrations and more.
Go to AffiliatePress → Settings → General in your WordPress dashboard to set the general settings.
Overview
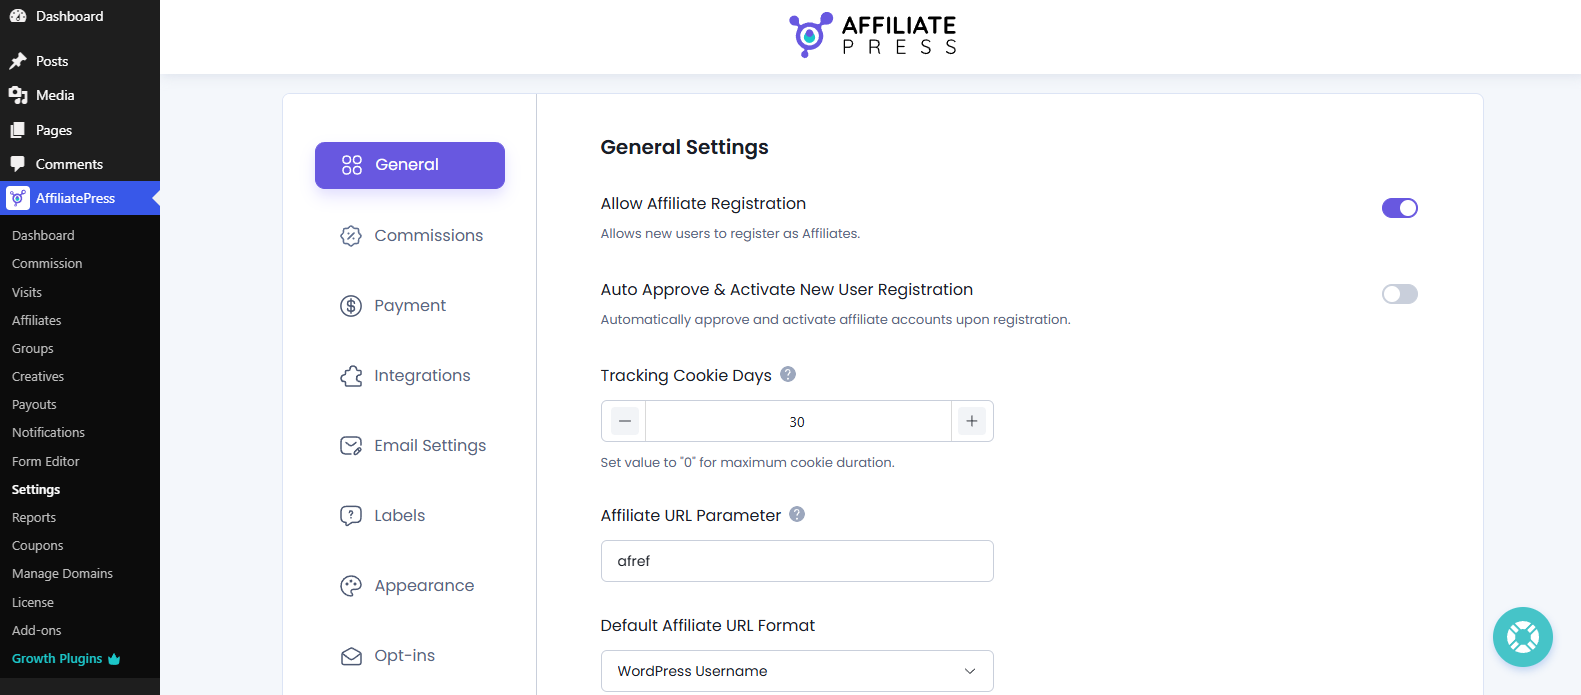
The General Settings section offers core options to get you started with AffiliatePress.
Allow Affiliate Registration
The Allow Affiliate Registration option lets visitors submit an application to join your affiliate program through the Affiliate Registration page.
When enabled, anyone who meets your requirements can register as an affiliate.
When disabled, the registration form will be still shown, but any new applications are not accepted. Existing affiliates can continue using their affiliate accounts, and only administrators can manually add new affiliates.
Auto Approve & Activate New User Registration
Auto Approve & Activate New User Registration automatically approves and activates new affiliate accounts as soon as users register through the affiliate registration form.
If disabled, every new affiliate application will remain pending until the administrators reviews and approves it manually from the Affiliates page.
Tracking Cookie Days
The Tracking Cookie Days setting decides how long an affiliate referral cookie remains active in a visitor’s browser after they click an affiliate link.
If the visitor completes a purchase within the specified number of days, the referral will be credited to the affiliate who referred them.
For example, let’s say, the cookie duration is set to 30 days and a customer makes a purchase 20 days after clicking an affiliate link. In this case, the affiliate will still get credit for that referral.
This cookie duration is also shown inside the Affiliate Panel so affiliates know how long referrals remain eligible for commission. For more detail on how it appears to affiliates, click here.
Note: AffiliatePress allows you to set the tracking cookie duration up to 180 days. Set value to “0” for maximum cookie duration.
Affiliate URL Parameter
The Affiliate URL Parameter identifies affiliate referral links by adding a query parameter to the URL.
Let’s say you set your Affiliate URL Parameter as:
afref
Then here’s how it will appear in website:
https://yourwebsite.com/?afref=john123
You can always customize the parameter to match your preference. However, avoid using WordPress reserved query variables, as they may conflict with WordPress functionality.
Important: Whenever you will change this parameter, existing affiliate URLs will be affected. Old Affiliate URLs will stop working. (So Please do not change until it’s necessary).
Default Affiliate URL Format
Choose the default format which will be used when generating affiliate referral links, from the drop down list with options:
- Affiliate ID (Encoded ID): Generates referral links using an encoded affiliate ID (Example: abX23).
- Affiliate ID (Plain ID): Generates referral links using the affiliate’s numeric ID (Example: 25).
- WordPress Username: Uses the affiliate’s WordPress username.
- MD5 Hashed Affiliate ID: Uses a hashed version of the affiliate ID for improved privacy.
Default Affiliate URL
This option allows you to set the desired affiliate URL. So if you want to URL with any specific page, then add the link accordingly, and AffiliatePress will add the affiliate parameter behind the link added.
By default, this is your website’s homepage. You can change it to any page on your website such as a landing page, sales page, or product page.
Enable Fancy Affiliate URL
This setting changes how affiliate referral links are generated. Rather than using the default query parameter format, AffiliatePress creates clean and readable URLs that are easier to share and remember.
Standard URL
https://yourwebsite.com/?afref=john123
Fancy URL
https://yourwebsite.com/afref/john123
Fancy affiliate URLs look more professional and are ideal for sharing through emails, social media, blogs, videos and other marketing channels.
Note: If Fancy URLs return a 404 Page Not Found error, go to WordPress → Settings → Permalinks and click Save Changes to refresh your permalink structure.
Allowed Affiliate User to Close Their Account
When enabled, affiliates can submit an account closure request from their Affiliate Panel. This allows administrators to review and manage account removal requests more easily instead of requiring affiliates to contact you manually.
Use this option to give affiliate users the option on their Affiliate panel to submit a close account request.
“Help us Improve AffiliatePress by sending anonymous usage stats” Setting
From here, the system anonymously shares completely non-personal usage information with the AffiliatePress team. This will help us understand and make our AffiliatePress plugin better for you.
No personal information, affiliate data or customer information is collected.
Maximum Custom Affiliate Links
Use this option to set how many custom affiliate links each affiliate can create from their Affiliate Panel.
Custom affiliate links allow affiliates to generate referral links for specific pages on your website, such as product pages, landing pages, or blog posts, rather than using only the default affiliate URL.
For example – let’s say, you set the limit to 5. Then affiliates can create up to five custom links from their Affiliate Panel. Once the limit is reached, they won’t be able to generate additional custom links unless existing ones are removed.
Note: Set the value to 0 to allow unlimited custom affiliate links.
Auto Affiliate Create On Register As User From Any Registration Form
Choose this option to make onboarding new affiliates easier. When enabled, AffiliatePress automatically creates an affiliate account whenever a new user registers through any supported WordPress registration form integrated with AffiliatePress.
Additionally, this setting also applies when you manually create a user from WordPress → Users → Add New. Here you’ll see the “Register User As Affiliate” checkbox. Just tick on it, and AffiliatePress will automatically create an affiliate account for that user.
If you prefer to manually decide who can become an affiliate, leave it disabled.
Enable Affiliate Login History
You can use this option to record and maintain all affiliate login activities.
When this setting is enabled, the system automatically stores the login date and time and logout date and time for every affiliate session. If an affiliate is automatically logged in immediately after registration, that first login is also recorded in the login history.
The login history gives a complete audit trail of affiliate account access and can be viewed by administrators to track affiliate activity.
For each login session, the system stores the following details:
- Login Date & Time
- Logout Date & Time
- IP Address
- Country
- Browser Information
This way administrators can easily track affiliate access, user sessions, and maintain accurate login records for security and auditing purposes.
Note: If this setting is disabled, new registration, login, and logout activities will not be recorded, but previously stored history will remain available.
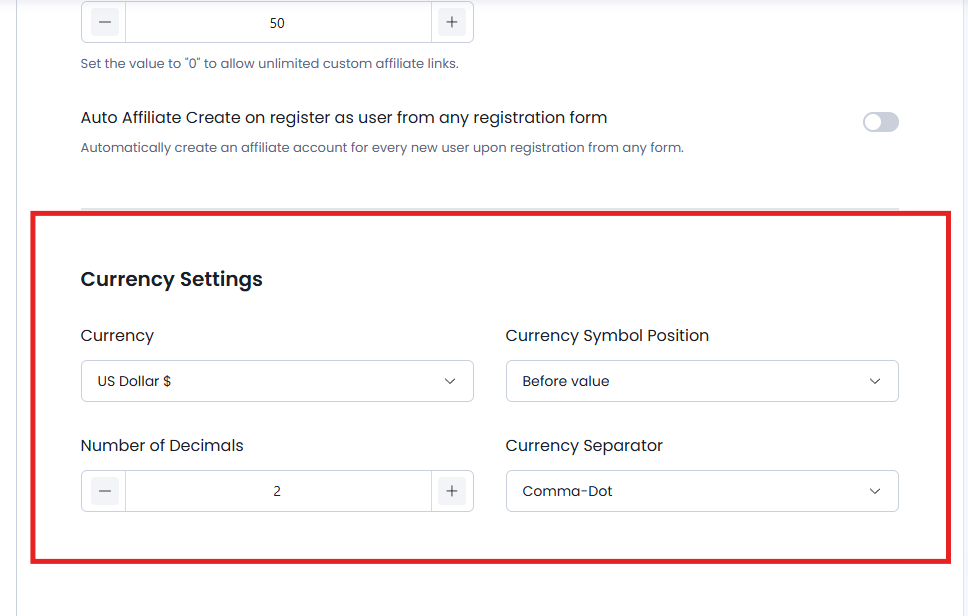
Currency Settings
Currency
Here you can select the default currency for your affiliate program.
AffiliatePress supports 125+ currencies so you can pay commissions and show monetary values in the currency that matches your business or store. If you change it, the show commission amounts across the whole AffiliatePress system will change as well.
Currency Symbol Position
Decide where the currency symbol should be placed before or after the commission amounts and other monetary values.
- Before Value: $100
- After Value: 100$
Go with the format that matches your preferred currency shown or your local currency conventions.
Number of Decimals
Controls how many decimal places are shown for commission amounts and other currency values.
For example if you set the value to 2, commission amounts will be shown as:
- $10.50
- $125.00
Adjust this value based on the level of precision you want to show for commission calculations.
Currency Separator
The Currency Separator setting defines the character used to separate thousands in currency values. This makes large amounts easier to read.
- Comma-Dot → 15,000.00
- Dot-Comma → 15.000,00
- Space-Dot → 15 000.00
- Space-Comma → 15 000,00
- Custom → Set your own thousand and decimal separators.
Go with the format that matches your regional or accounting format.
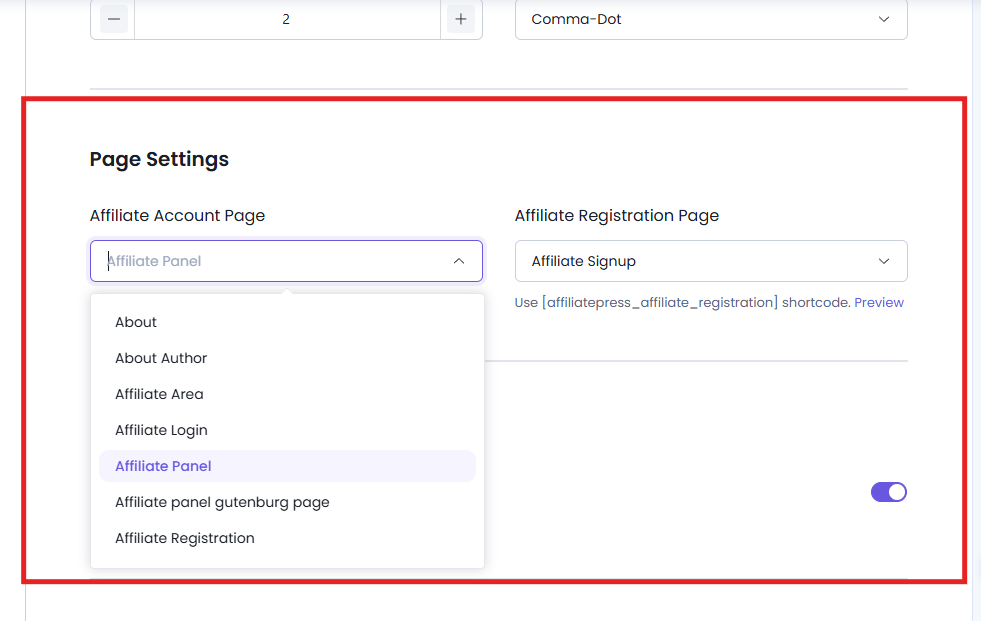
Page Settings
Affiliate Account Page
Here you can select the page where affiliates will manage their accounts.
By default, this is set to the Affiliate Panel page. However, if you choose a different page, make sure to add the shortcode shown on that page.
Moreover, AffiliatePress allows you to check the preview of the page, so you can click on “Preview,” and you will be able to check the page selected.
Affiliate Registration Page
Here you can select the page where the affiliate’s user will register.
By default, this is set to the Affiliate Signup Page. However, if you choose a different page, make sure to add the shortcode displayed on that page.
Moreover, AffiliatePress allows you to check the preview of the page, so you can click on “Preview,” and you will be able to check the page selected.
Affiliate QR Codes
AffiliatePress allows affiliates to generate QR codes for their unique affiliate referral URLs. These QR codes make it easy to promote affiliate links through offline and mobile marketing channels such as business cards, flyers, brochures, posters, event materials, product packaging, and printed advertisements.
To use this feature, you must install and activate the AffiliatePress QR Codes Addon. Once activated, affiliates can generate and share QR codes right from their Affiliate Panel, while all visits and referrals are tracked just like standard affiliate links.
For detailed setup instructions and more information, click here.
Multi-Currency Settings
AffiliatePress allows you to automatically convert affiliate commission amounts from multiple currencies into your configured default currency.
To use this feature, you must install and activate the AffiliatePress Multi-Currency Addon. The addon supports over 20 popular WordPress integrations and lets you convert affiliate commissions using either live exchange rates from supported providers or manually configured exchange rates. This makes sure all affiliate commissions are stored properly, and managed consistently in your default currency.
For detailed setup instructions and more information, click here.
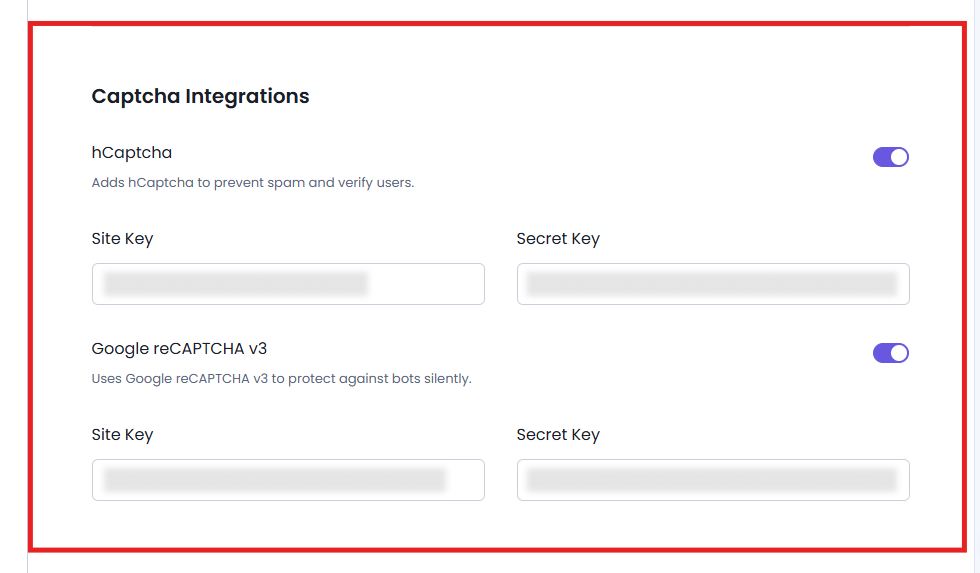
Captcha Integrations
hCaptcha
hCaptcha Setting option prevents spambots from registering and logging into affiliate accounts. After enabling it, you’ll see two fields for entering:
- Site Key
- Secret Key
For getting them both, follow the below steps:
- Go to hCaptcha and sign up for an account, or log in if you already have one.
- After logging in, you will be directed to the “Sites” page.
- Click the “Add a new site” button.
- Enter your site’s domain name (e.g., yourwebsite.com) and select the desired settings for your site.
- Click the “Save” button to create your site key.
- In your hCaptcha dashboard, navigate to Sites and click on the site you wish to integrate. Copy the site key and paste it into the Site Key field in your AffiliatePress settings.
- Go to the Settings page of your hCaptcha dashboard, where you will find your account’s secret key. You may need to generate a new secret key, or you can use the existing one if you already have it. If you generate a new key, you will need to update it wherever hCaptcha is integrated.
- Lastly, paste the secret key into the Secret Key field in your AffiliatePress settings.
After completing these steps, hCaptcha will be successfully integrated into your site.
Google reCAPTCHA v3
Google reCAPTCHA v3 setting option protects affiliate accounts against spambots silently. After enabling it, you’ll see two fields for entering:
- Site Key
- Secret Key
For getting them both, follow the below steps:
- Go to the Google reCAPTCHA website and sign in with your Google account.
- Click on Admin Console at the top right.
- If you don’t have an existing reCAPTCHA site, click on + to add a new one.
- Once the site is registered, you will be provided with a Site Key and a Secret Key. Copy both keys.
- Paste the Site Key into the Site Key AffiliatePress Setting field.
- Paste the Secret Key into the Secret Key AffiliatePress Setting field.
After completing these steps, Google reCAPTCHA v3 will be successfully integrated into your site.
Multi-Level Commission
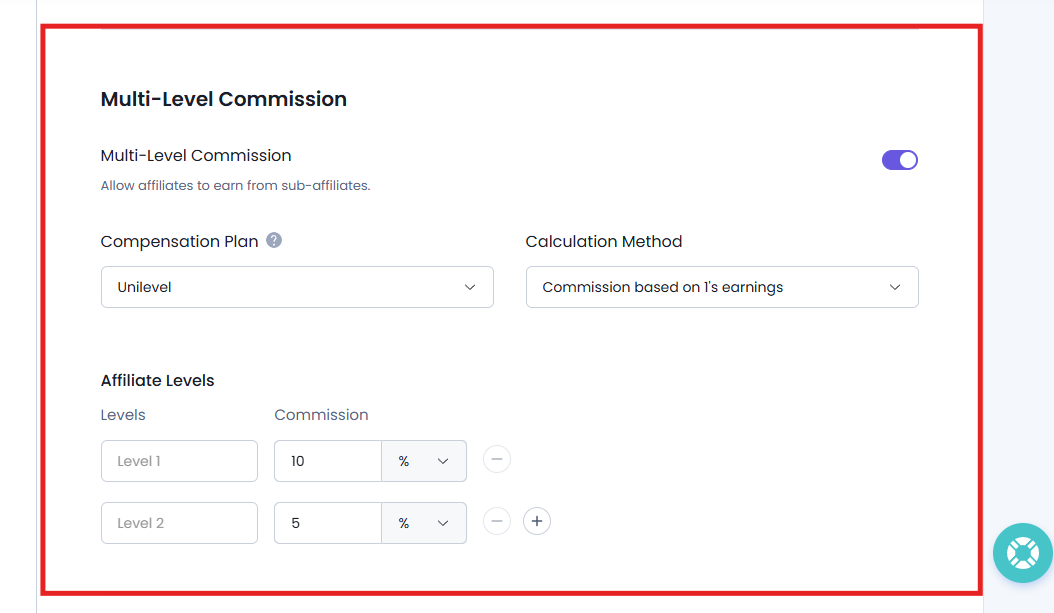
AffiliatePress allows you to create a multi-level affiliate program where affiliates can earn commissions not only from their own referrals but also from the referrals generated by affiliates they recruit.
To use this feature, you need to install and set up AffiliatePress Multi-Level Affiliates Addon. Then you can easily create a powerful affiliate network where affiliates can earn commissions from both their own referrals and the sales generated by affiliates they recruit.
For detailed setup instructions and more information, click here.
Bitly Settings
AffiliatePress allows affiliates to generate shortened Bitly links for their affiliate referral URLs. To use this feature, you must install and activate the AffiliatePress Bitly Integrations.
After it’s connected with your Bitly account, affiliate referral URLs are automatically converted into short and shareable links These shortened links are easier to share, more visually appealing, and help improve click tracking and campaign performance.
For detailed setup instructions and more information, click here.
Setup Wizard
The Setup Wizard allows you to run the AffiliatePress setup wizard again at any time.
If you want to reconfigure your affiliate program or set up initial steps, simply click “Start the setup wizard” icon.
The AffiliatePress Setup Wizard is a guided onboarding that helps you configure your complete affiliate program in just 5-10 minutes. It automatically maps out core settings like commission rates, payout methods and plugin integrations.
Data Cleanup & Reset
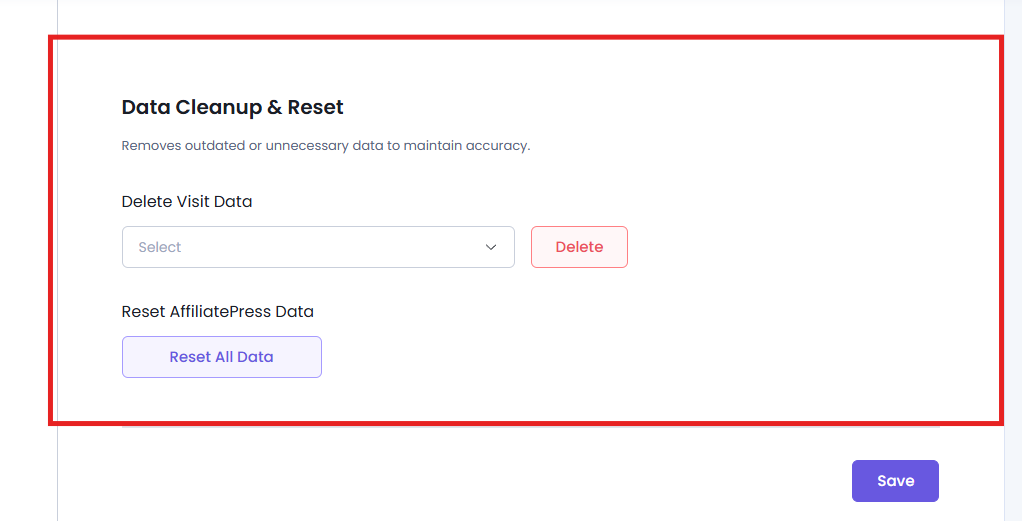
The Data Cleanup & Reset section provides tools to manage or remove AffiliatePress data from your website.
Delete Visit Data
You can delete affiliate visit records that are no longer needed. Just select the predefined period or specify a custom date range to keep your database clean:
- 1 Week Old Or More
- 1 Month Old Or More
- 1 Year Old Or More
- Custom
Hit the Delete button, and confirm yes if you want to delete the affiliate visit data of the selected duration.
Reset AffiliatePress Data
This option permanently removes AffiliatePress data from your website while keeping the plugin’s basic configuration settings intact.
After you click the “Reset All Data“, AffiliatePress shows a confirmation popup showing the data that will be deleted. This includes:
- Total Affiliates
- Total Commission
- Total Visits
- Total Payouts
This way you can review the action before proceeding with Confirm.
Warning: This action permanently deletes AffiliatePress data and cannot be undone. We recommend you create a backup of your website before the reset.
Lastly, don’t forget to hit the Save to apply these all changes.