



GetPaid Integration
Integrating GetPaid with AffiliatePress is easy. All you have to do is simply enable the integration, and configure settings from the GetPaid plugins. Once all set, AffiliatePress tracks all affiliate commissions in real time whenever customers buy any allowed products or services through GetPaid.

Here;’s how to integrate GetPaid with AffiliatePress in just a few simple steps.
Before You Begin
Before configuring the integration, make sure you have the following installed and activated:
- WordPress with administrator access
- GetPaid (Pro)
- AffiliatePress
Set Up GetPaid Integration
Follow these steps to connect GetPaid with AffiliatePress:
- Head over to AffiliatePress → Settings → Integrations.
- Scroll down until you find the GetPaid integration.
- Turn on the integration.
- Save your changes.
After saving your settings, the following commission option becomes available.
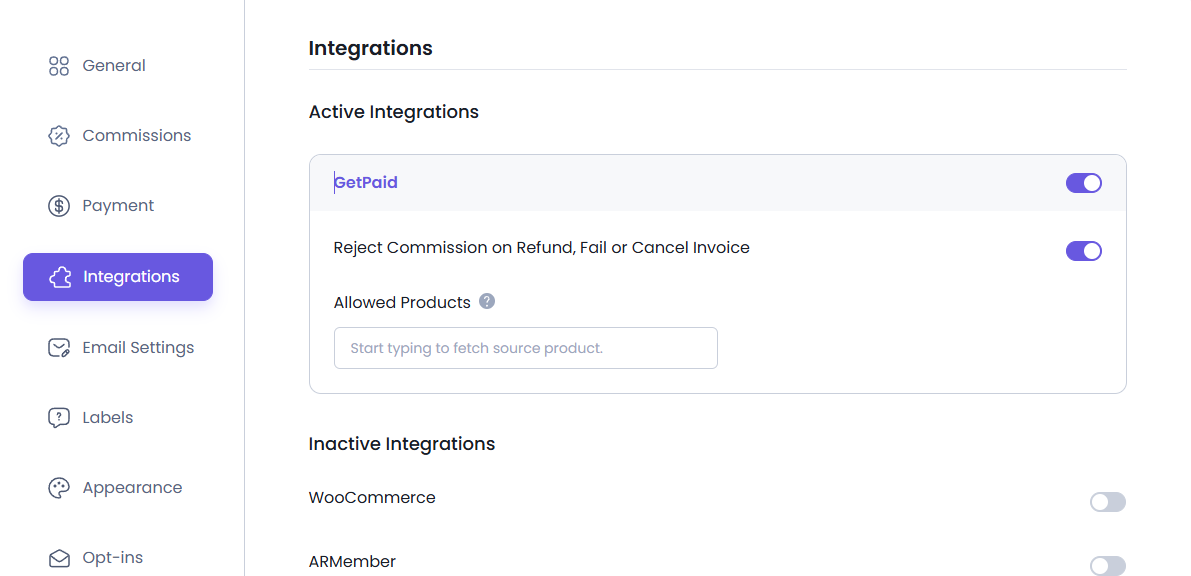
Reject Commission on Refunded, Failed, or Cancelled Invoices
AffiliatePress can automatically reject unpaid affiliate commissions whenever a GetPaid invoice is:
- Refunded
- Failed
- Cancelled
This way, commissions are created only for successfully completed purchases.
Note: This setting affects only commissions that have not yet been paid.
Disable Commissions for Individual Items
If you don’t want a particular product or service to generate affiliate commissions, you can disable commission tracking for that item. Yet just so you know that AffiliatePress by default generates commissions for every GetPaid item.
To do this:
- Head over to GetPaid → Items.
- Open the item you want to modify.
- Scroll down to the AffiliatePress Commission Settings section.
- Turn on the Disable Commissions option.
- Save your changes.
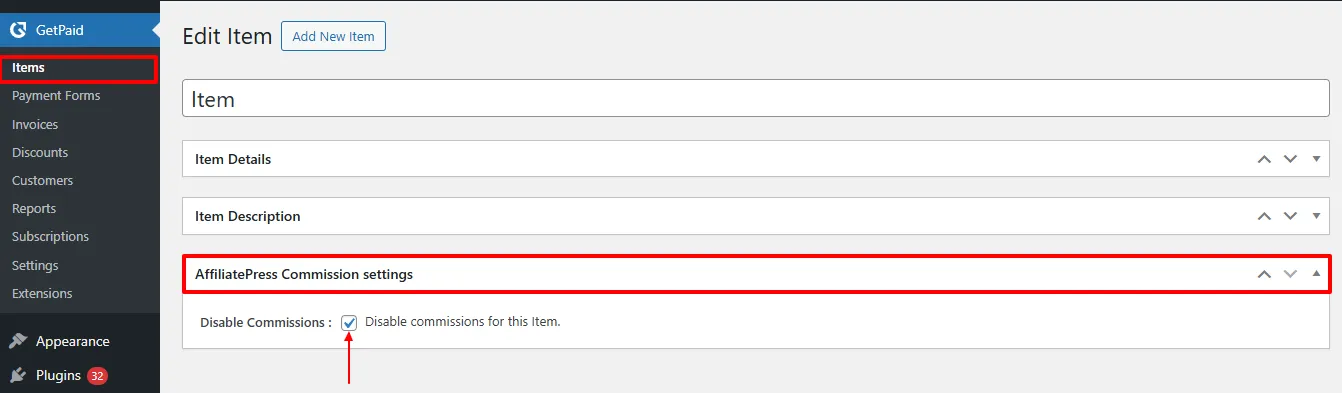
Note: AffiliatePress item settings are available only with the Pro version of GetPaid.
Product-wise Commission Add-on Support
AffiliatePress allows you to set different commission rates for individual GetPaid items.
To use this feature, you must install and activate the AffiliatePress Product-wise Commission Rate Addon. Once activated, you can assign custom commission rates to specific items while keeping your default commission settings for other items.
For example:
| Item | Commission |
| Premium Subscription | 20% |
| Consultation Service | 15% |
| Digital Download | Default Rate |
Item specific commission rates always take priority over:
- Default commission
- Group commission
- Affiliate specific commission
Items without a custom commission rate continue using your default AffiliatePress commission settings.
For detailed setup instructions and more information, click here.
Product Selection Add-on
AffiliatePress allows you to control which GetPaid items are eligible for affiliate commissions.
To use this feature, you must install and activate the AffiliatePress Product Selection Addon. Once activated, you can select specific items that should generate affiliate commissions. Items that are not selected will not generate commissions.
After installing the add-on:
- Go to the GetPaid integration settings.
- Choose the items under Allowed Products.
- Save your settings.
Only the selected items will generate affiliate commissions. All other items will be ignored.
For detailed setup instructions and more information, click here.
How GetPaid Commission Tracking Works
After the integration has been configured:
- A visitor clicks an affiliate link.
- The visitor purchases a GetPaid item.
- AffiliatePress verifies the completed payment.
- A commission is generated according to your configured commission settings.
- If the invoice is refunded, cancelled, or fails before the commission is paid, AffiliatePress can automatically reject the commission based on your settings.