



Affiliate Management
Every affiliate in AffiliatePress is managed from the Affiliates page. Whether an affiliate registers through your website or is added manually, you can review their application, approve or reject their account, assign commission settings, update profile information, monitor affiliate activity and manage their account until they leave your affiliate program.
This guide walks you through every affiliate management feature available in AffiliatePress.
View and Manage Affiliates
You can view and manage your affiliate list from WordPress → AffiliatePress → Affiliates.
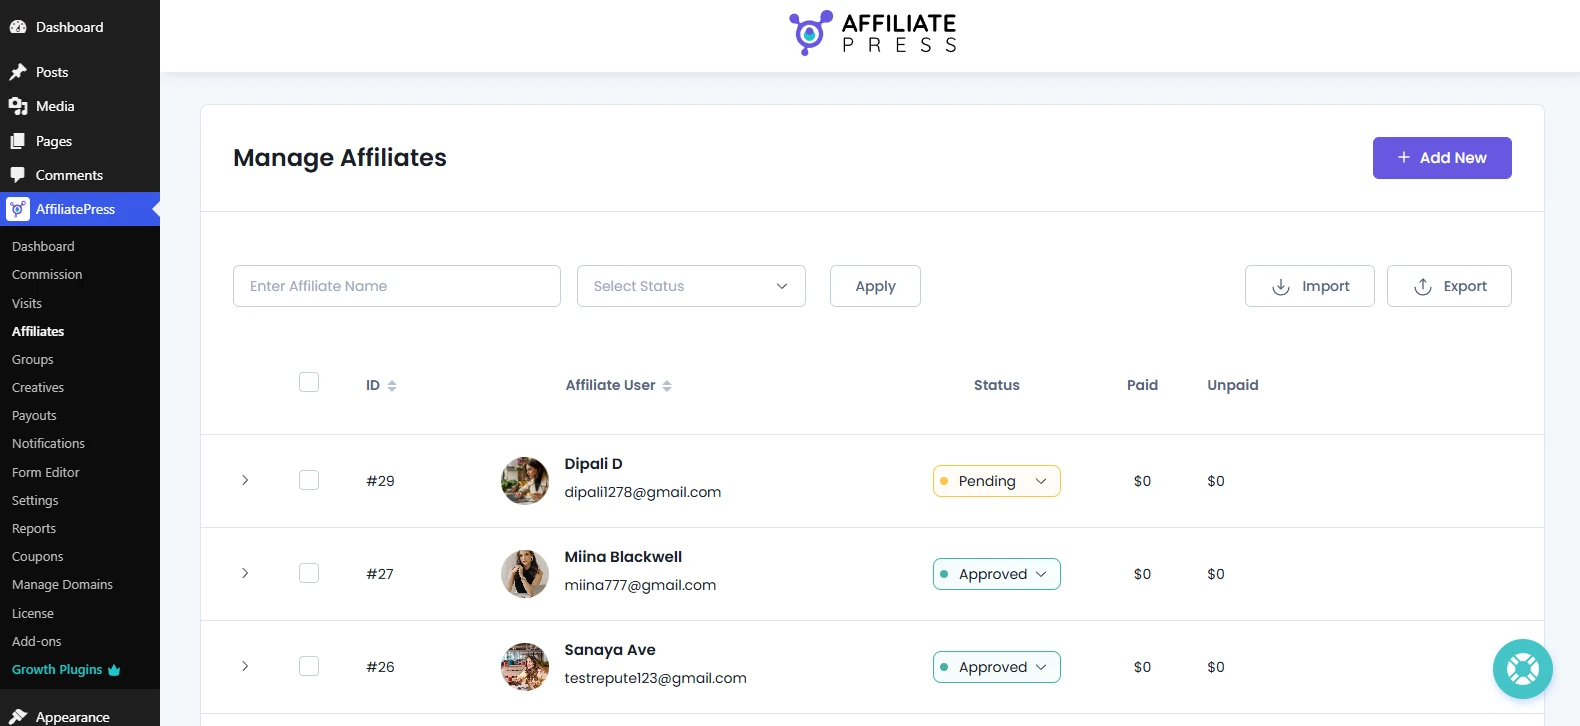
Affiliate List
The Affiliate List gives you an overview of every affiliate in your program, registered or not. Each row shows important key information about an affiliate which makes it easy to track their activity and manage their account.
From the Affiliate List, you can see their:
- ID: It’s the unique ID assigned to each affiliate.
- Affiliate User: View the affiliate’s name and email address.
- Status: Shows whether the affiliate application is pending, approved or rejected.
- Paid: Total commission amount which is paid.
- Unpaid: Total commission amount yet to be paid.
If you want more details about any specific affiliate, click on its row and further information regarding that affiliate will show up below.
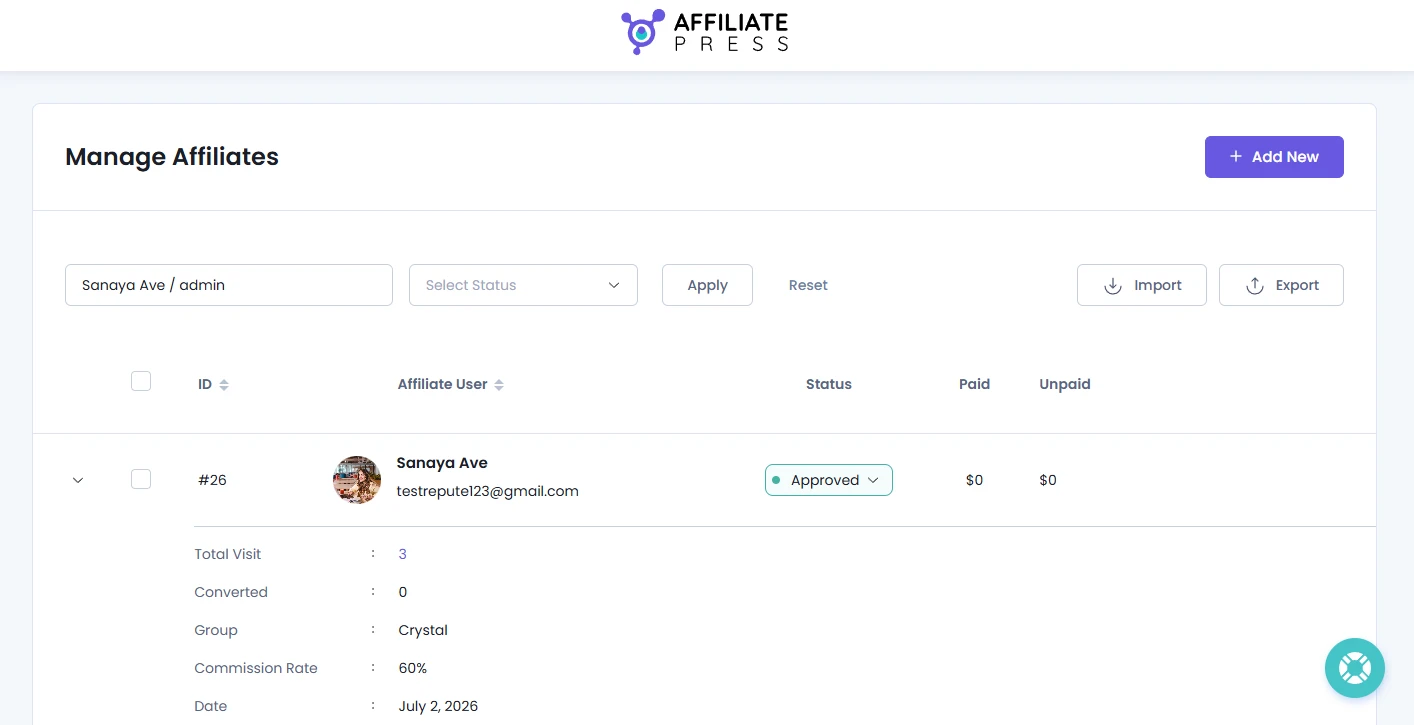
Information such as:
- Total Visits: Number of total visitors.
- Converted: Number of total converted referrals out of total number of visitors.
- Group: Assigned group-wise commission.
- Commission Rate: Current commission rate.
- Date: Date on which the affiliate registered.
Furthermore, you can access actions such as Edit, Delete and Flag Affiliate by hovering over an affiliate row, which we’ll discuss ahead in this guide.
Filter Affiliates
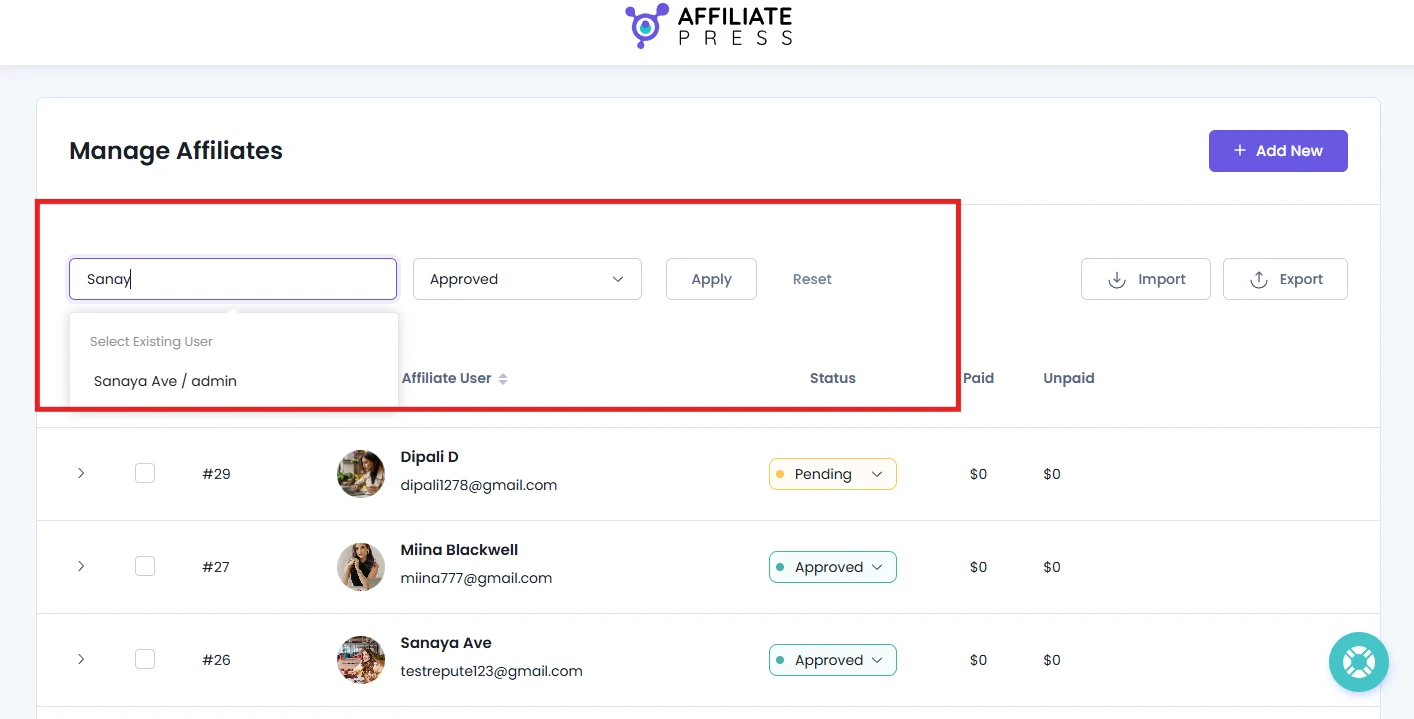
When managing a large number of affiliates, you can quickly find specific records using the available filters above. You can use this to:
- Search affiliates by their name or username.
- Filter affiliates based on their current status from the dropdown list.
After entering the affiliate name or selecting the affiliate status, click on the Apply button. This will shortlist all the affiliates as you need.
Hit the Reset next to the Apply button to reset the filters.
Update Affiliate Status
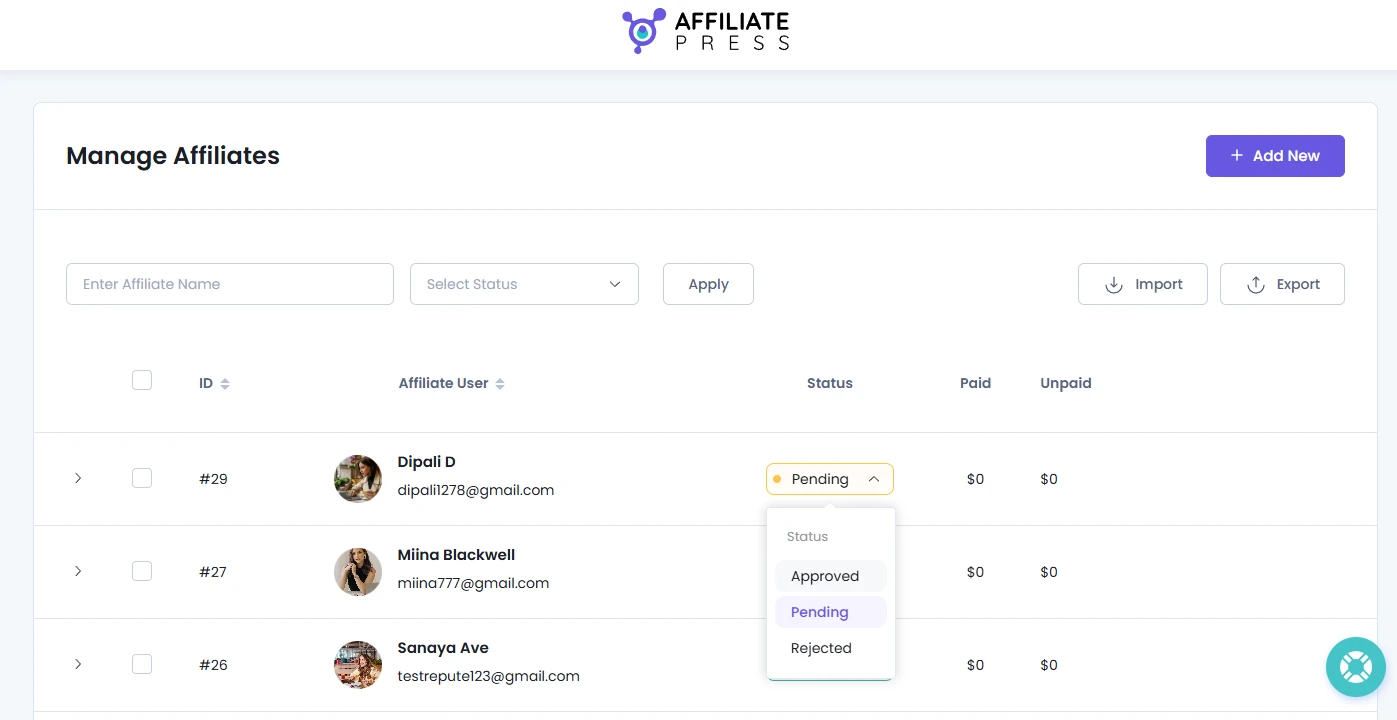
You can change an affiliate’s status directly from the Affiliates page.
Select the Affiliate Status for an affiliate using the available status dropdown:
- Approved
- Pending
- Reject
Updating an affiliate’s status allows you to manage who can participate in your affiliate program and helps keep affiliate records up to date.
Note: If an affiliate’s status is changed from Approved or Pending to Rejected, AffiliatePress automatically updates the all related commission records status as well.
- All commissions with the status Pending and Approved will be changed to Rejected.
- Commissions with the status paid will not be affected and will remain unchanged.
Furthermore, if the affiliate’s status is later changed from Rejected to Pending or Approved:
- Commission statuses will not be automatically updated.
- Previously rejected commissions will remain rejected.
- Paid commissions will remain unchanged.
Bulk Actions
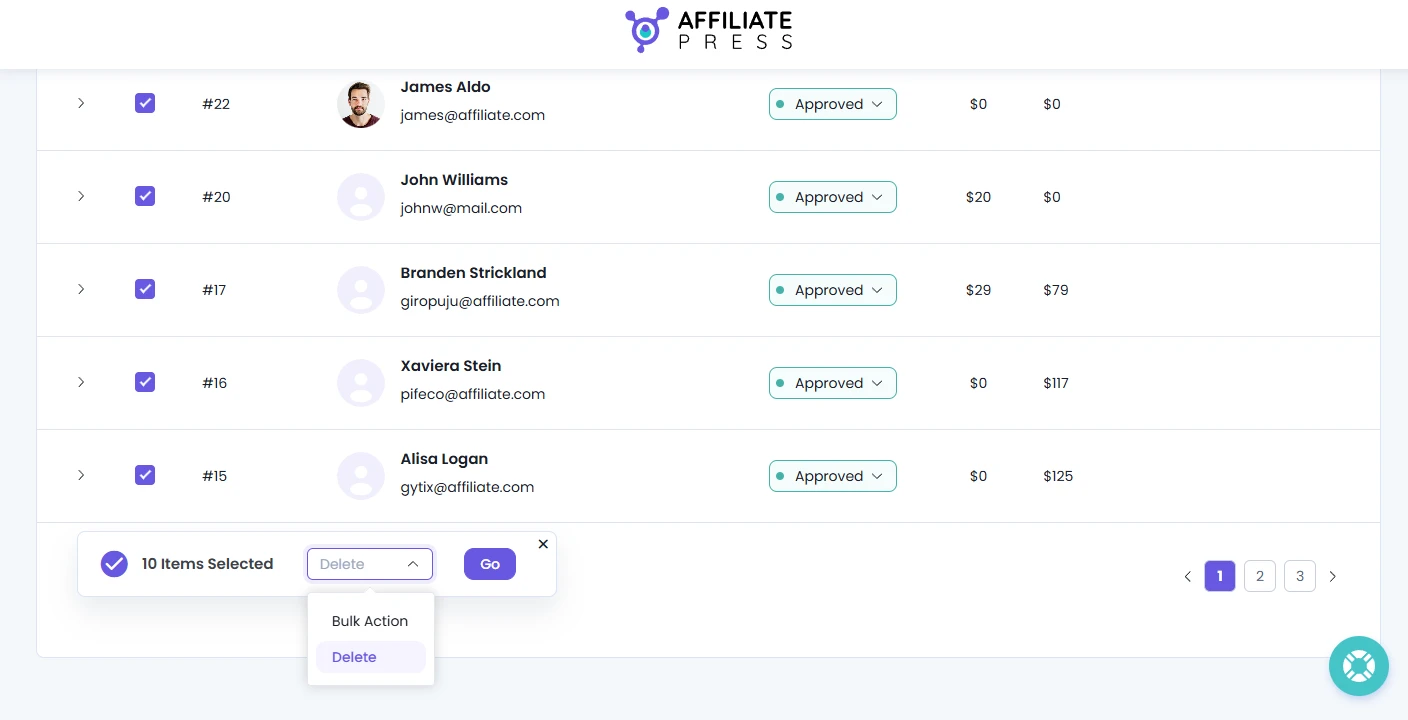
AffiliatePress also allows you to manage multiple affiliates at the same time. Here’s how to do it:
- Simply one or more affiliates using the checkboxes beside each affiliate record.
- After selecting, the bulk action bar appears at the bottom of the page.
- On the Affiliates page, the only bulk action you can perform is Delete.
- Thus, Select the Delete action and click Go to apply it to all selected affiliates.
This Delete Bulk action helps you delete multiple affiliates in one go.
How to Add a New Affiliate in AffiliatePress
You can manually add an affiliate in AffiliatePress if they haven’t registered via your affiliate registration form. This is useful when adding existing partners, influencers, team members or affiliates you’ve migrated from another platform.
To add a new affiliate manually in the AffiliatePress, click on the “Add New” button at the top-right corner.
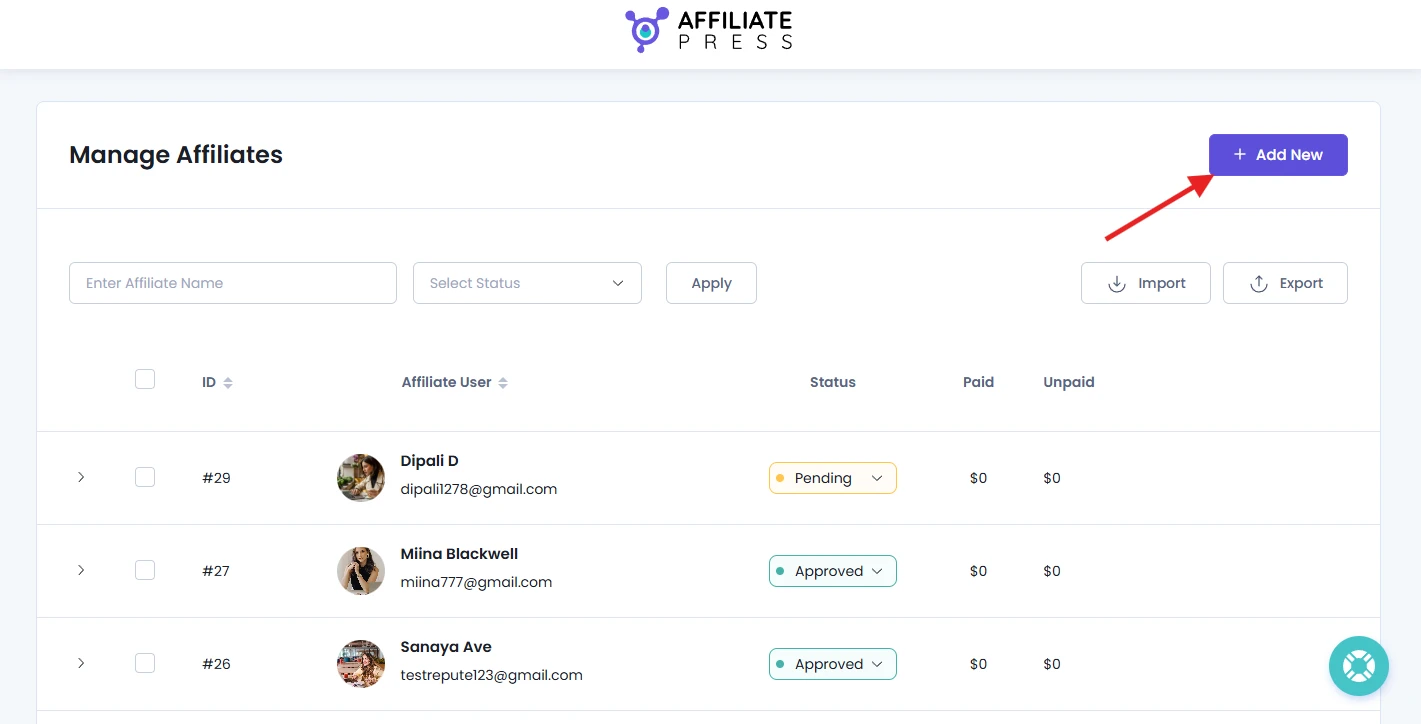
This will open a side section where you can fill in all the necessary details of the affiliate.
Affiliate Details
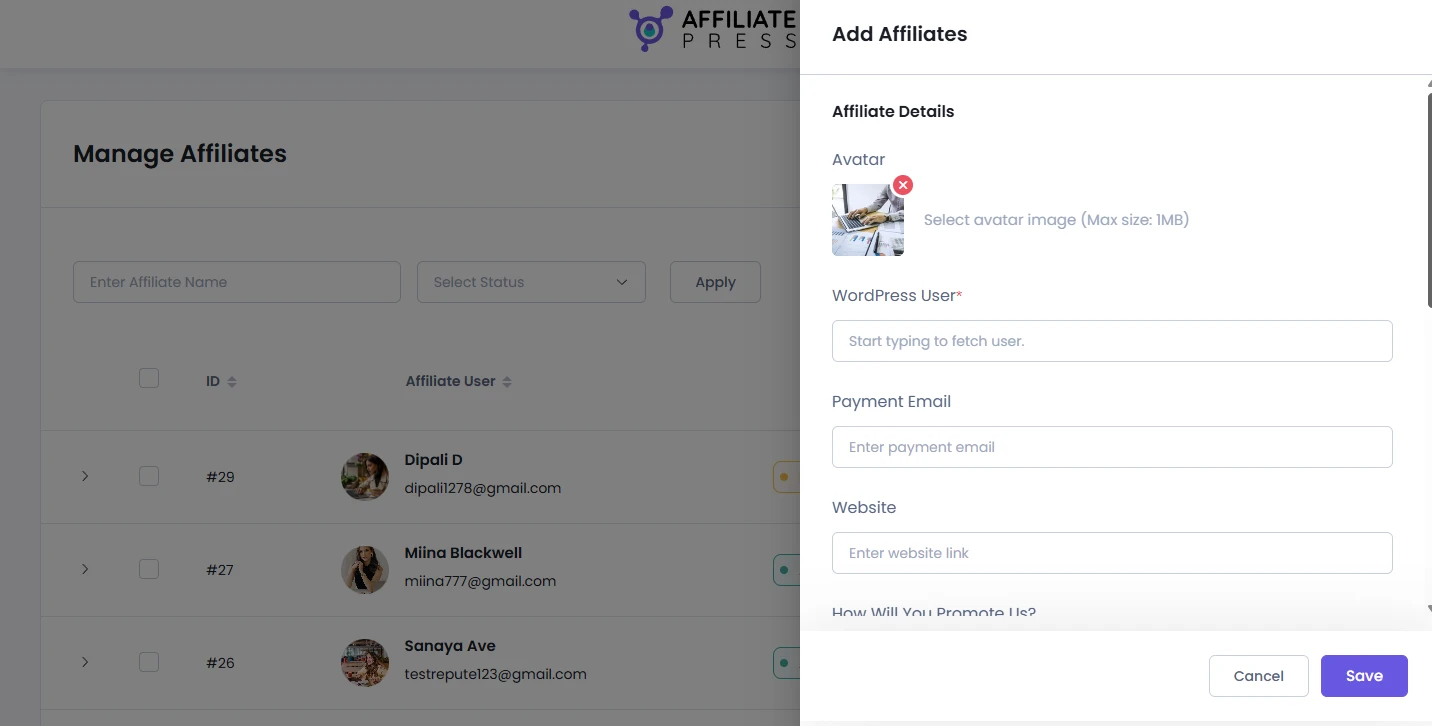
Here are the basic affiliate details you’ll need to enter for creating a new affiliate account manually from the AffiliatePress admin side.
Depending on whether you’re adding an existing WordPress user or creating a new one, some fields may appear or change automatically.
Avatar
Upload the avatar image of the affiliate here. Make sure the maximum image size is 1 MB, and the supported formats are JPG, JPEG, PNG and WebP.
WordPress User
This is the only required field for creating an affiliate account.
Note: AffiliatePress will first let you search for an existing WordPress user account. This is because every affiliate in AffiliatePress must be linked directly to a WordPress user account. If the user doesn’t already exist on your website, you can create a new WordPress user and affiliate account at the same time directly from this form.
To add an existing WordPress user, start typing the user’s name. If you see the user you were looking for, select it from the suggestions.
However if the user account is not found, create a new user by clicking on the Create New from the drop down list. After selecting the Create New, the following must-fill options will appear:
- First Name
- Last Name
- User Name
- User Email
- Password
- Confirm Password
All of these fields are required to create a new WordPress affiliate user directly from the AffiliatePress admin panel.
Payment Email
Next, enter the email address where affiliate payouts will be sent. This field is optional.
Website
You can also add the affiliate’s website URL link.
How Will You Promote Us?
Mostly this field is filled by affiliates when they sign up from the registration form. But since we are creating affiliate accounts here manually, you can specify how the affiliate plans to promote your products or services.
Status
Set the affiliate’s status from the dropdown list:
- Approved
- Pending
- Rejected
Affiliate Group
If you’ve created affiliate groups or have set group-wise commission rates, assign your affiliate to the specific affiliate group from the drop down list.
Note: If you haven’t created any affiliate groups yet, go to the AffiliatePress → Groups, and Add New group from there. Follow this beginner friendly guide to create Affiliate Groups.
Individual Commission Rate
Enable this option to assign a custom commission rate for this affiliate rather than the default program commission.
Enter Commission Rate
Select the percentage-based or fixed commission structure.
Important: The commission rate set here will take first priority, followed by the group, and then default commission rates.

Notes
AffiliatePress offers an interesting feature through which you can add internal notes individually as per each affiliate
Here you can add your internal notes that are only visible to you (administrators).
Send Welcome Email
Just Toggle it On to automatically send a welcome email after creating the affiliate.
Lastly, after entering all the affiliate details, click Save to create the affiliate account.
Furthermore, if you have Sign Up Bonus Addon, you can also enable it from here with just a simple toggle on. And the same goes for those who have Multi-level Commission Addon. You can also select the Parent Affiliate from here.
Alternative Method: Add an Affiliate from the WordPress Users Page
You can also create an affiliate while adding a new WordPress user directly from WordPress Dashboard.
- Go to the WordPress Admin → Users → Add User.
- Now enter all the user’s details.
- After all details are added, tick on the Register User as Affiliate checkout.
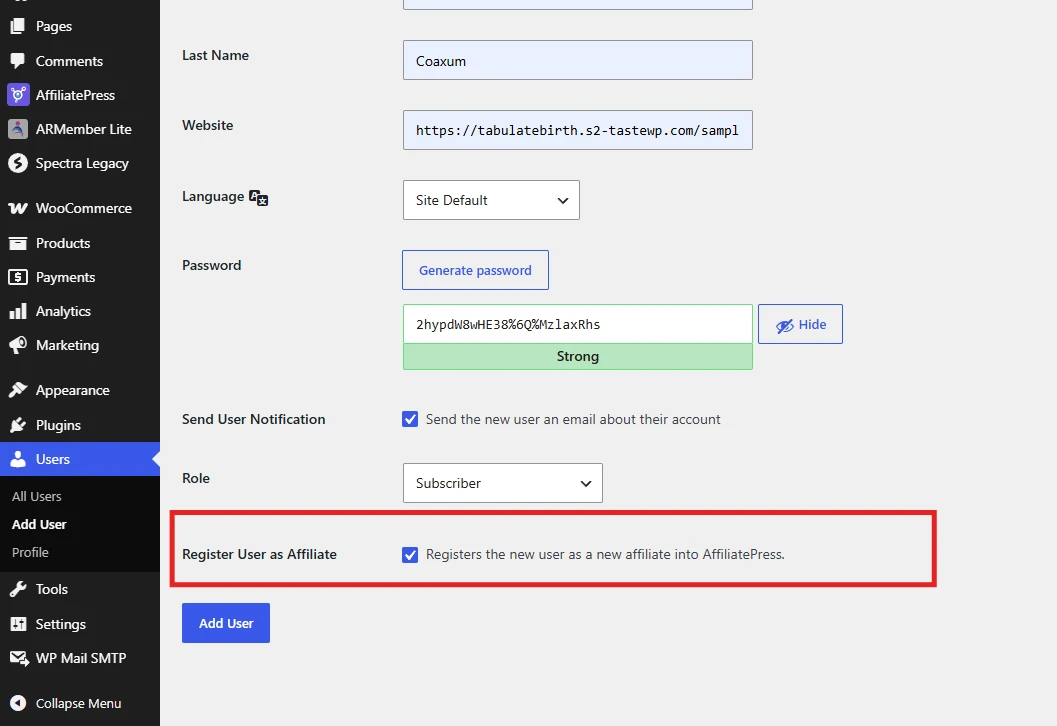
- Lastly, click on the Add User.
The user will be added as both a WordPress user and an affiliate.
How to Manage Existing Affiliates in AffiliatePress
After an affiliate has been added, you can update their details, track their activity or remove them whenever needed right from here.
AffiliatePress gives you several management options to keep your affiliate program organized and secure. Simply hover an affiliate record, and you’ll see the following options:
Flag Suspicious Affiliates

If you notice unusual or suspicious affiliate activity, you can easily flag the affiliate for your internal monitoring.
Flagging an affiliate allows you to identify potentially fraudulent accounts without immediately deleting or rejecting them. To flag an affiliate :
- Hover over the affiliate you want to review inside AffiliatePress → Affiliates.
- Click the Flag Affiliate icon.
- After that, a popup box will ask you to confirm,” Are you sure you want to set this Affiliate as flagged?”
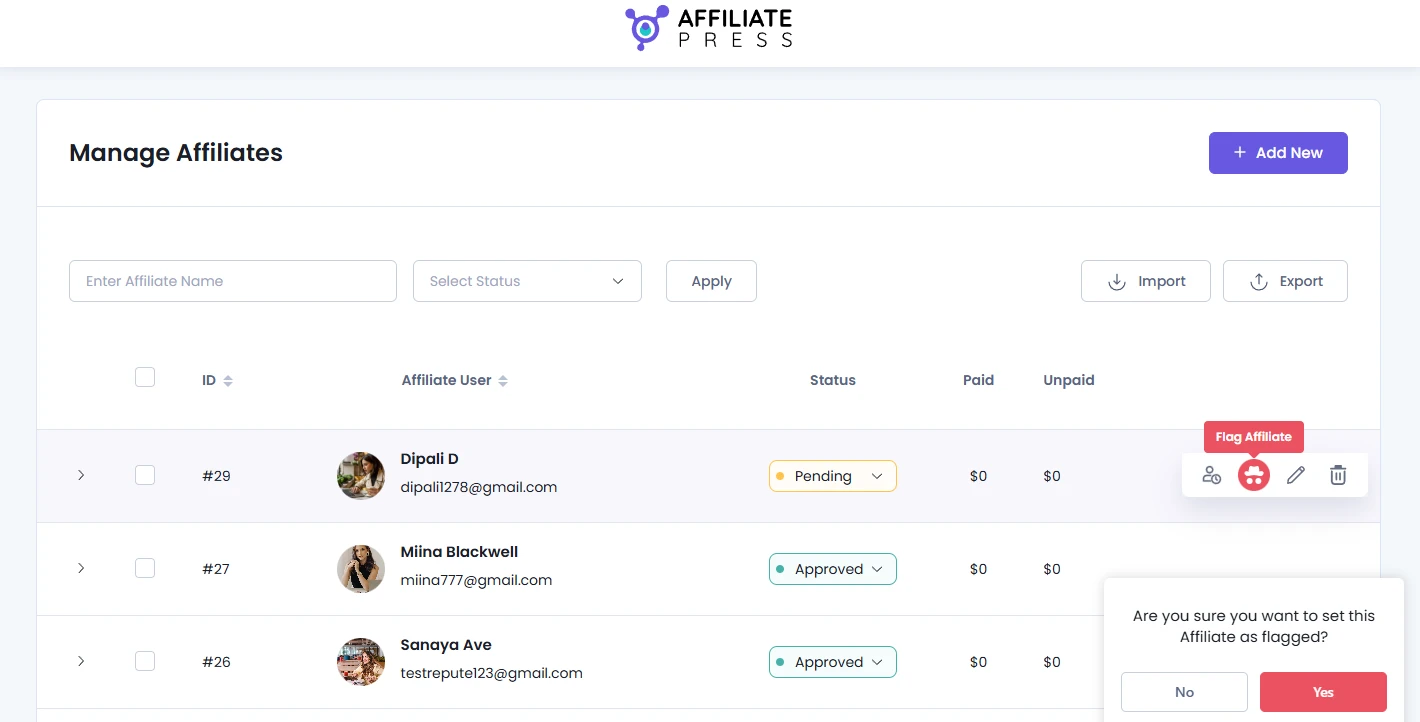
- Click Yes in the confirmation box.
Once an affiliate is flagged, its record is highlighted red in the Affiliates list. This makes it easier to recognize and track their activity internally.
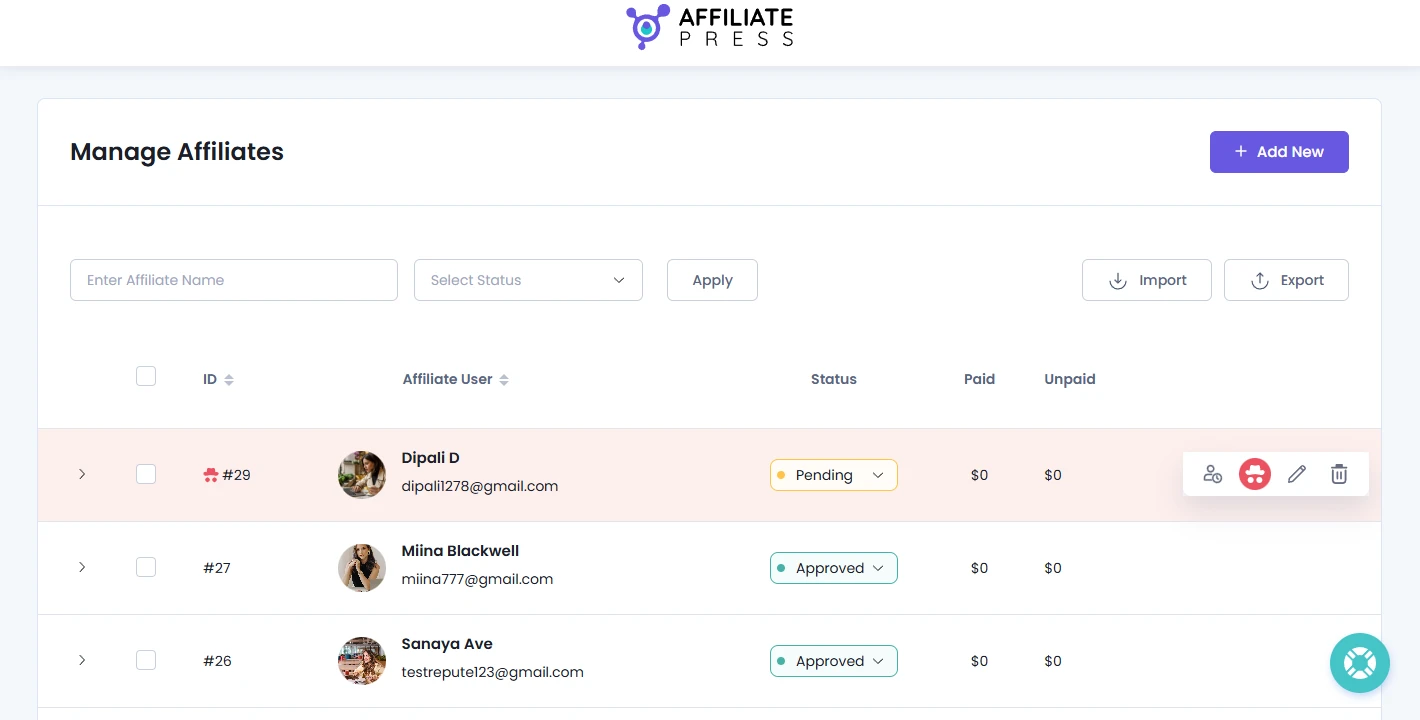
Apart from this, even commissions generated by flagged affiliates are also highlighted red on the Commissions page, allowing you to review suspicious referral activity everywhere.
Edit an Affiliate
You can easily update an affiliate’s details at any time such as their payment email, affiliate group, commission rate, status or other profile details.
To edit an affiliate inside the Affiliates page, simply hover over the affiliate record you want to edit.
Next, click on the Edit icon.
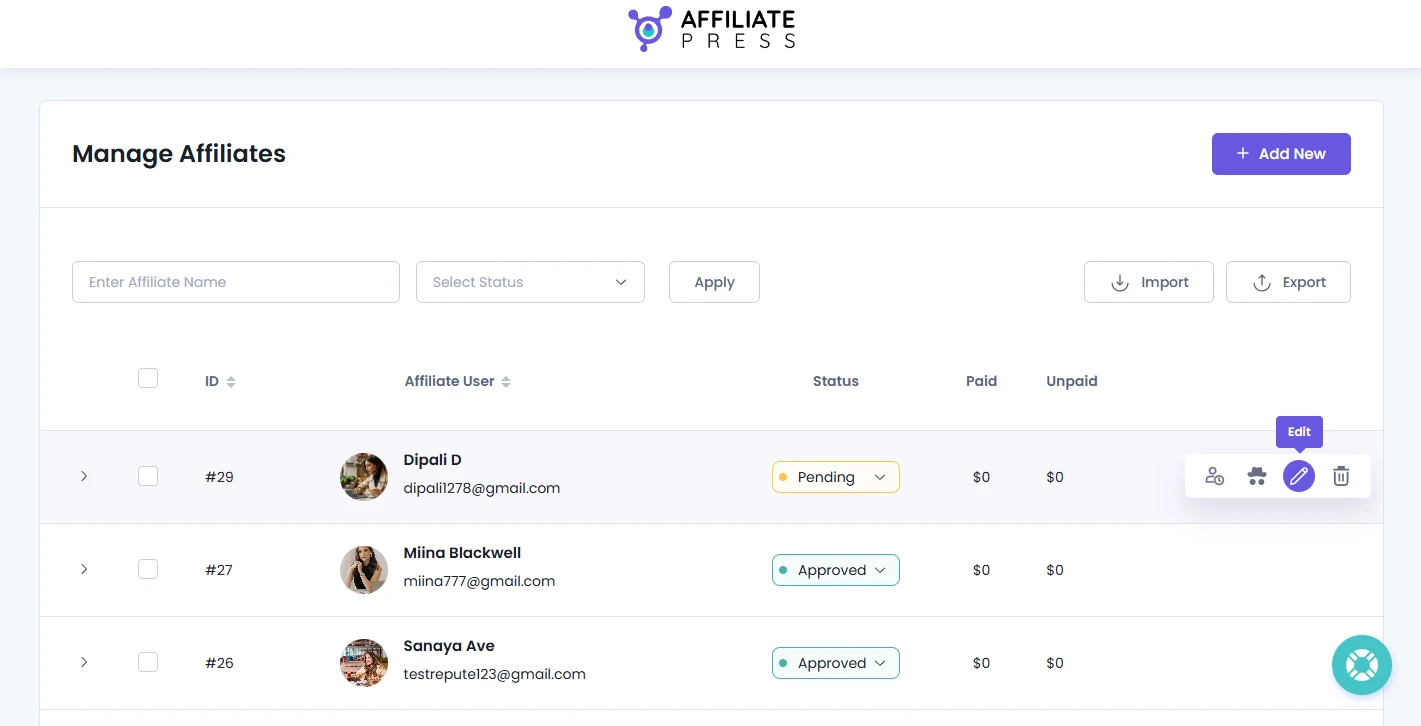
This will slide open the Edit Affiliate form where you can update all the details you want. The only difference here compared to Add Affiliate form is you can’t change WordPress users.
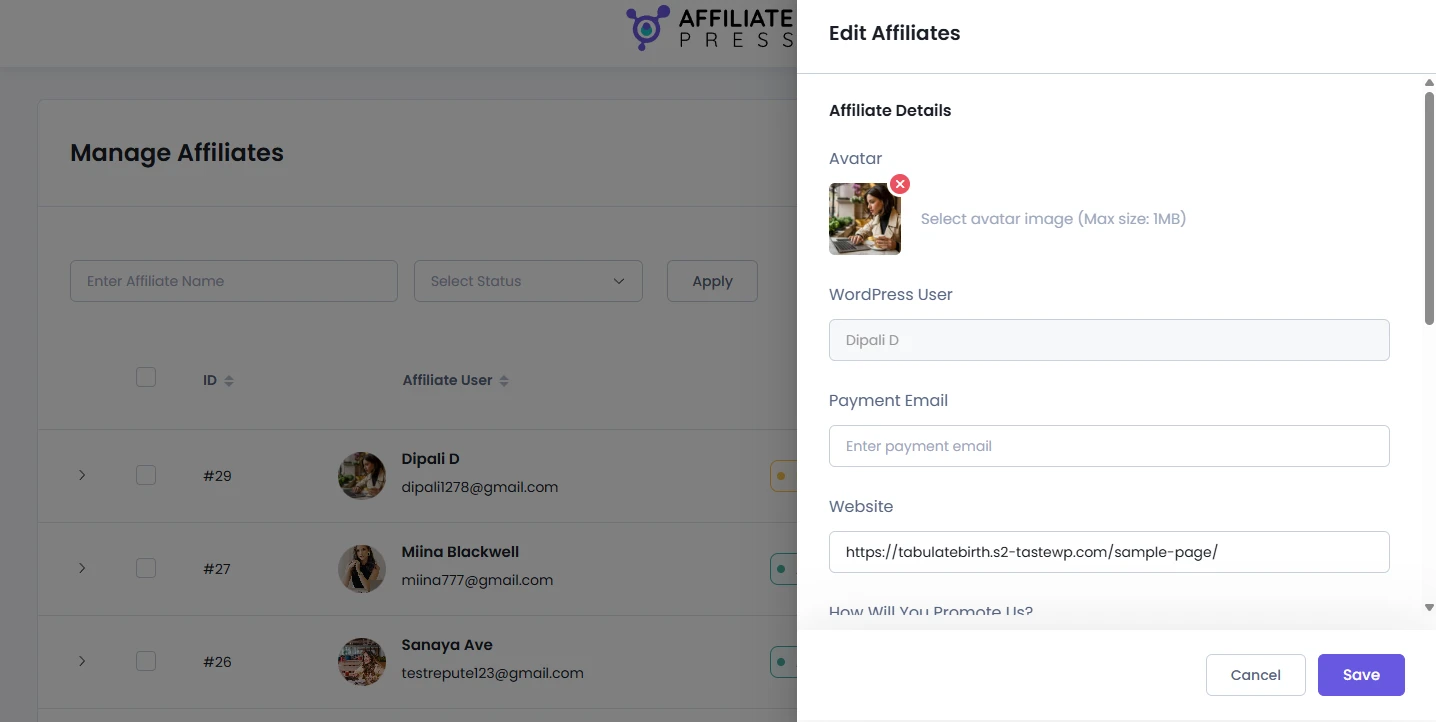
After updating the required affiliate details, hit the Save button to apply your changes.
Delete Affiliate
If an affiliate is no longer part of your affiliate program, you can permanently remove their affiliate account.
For deleting a specific affiliate:
- Hover over the affiliate you want to remove inside AffiliatePress → Affiliates.
- Click the Delete icon.
- This will open a popup confirmation box asking,” Are you sure you want to delete this affiliate?”. This is because you don’t by mistake delete an important affiliate record.
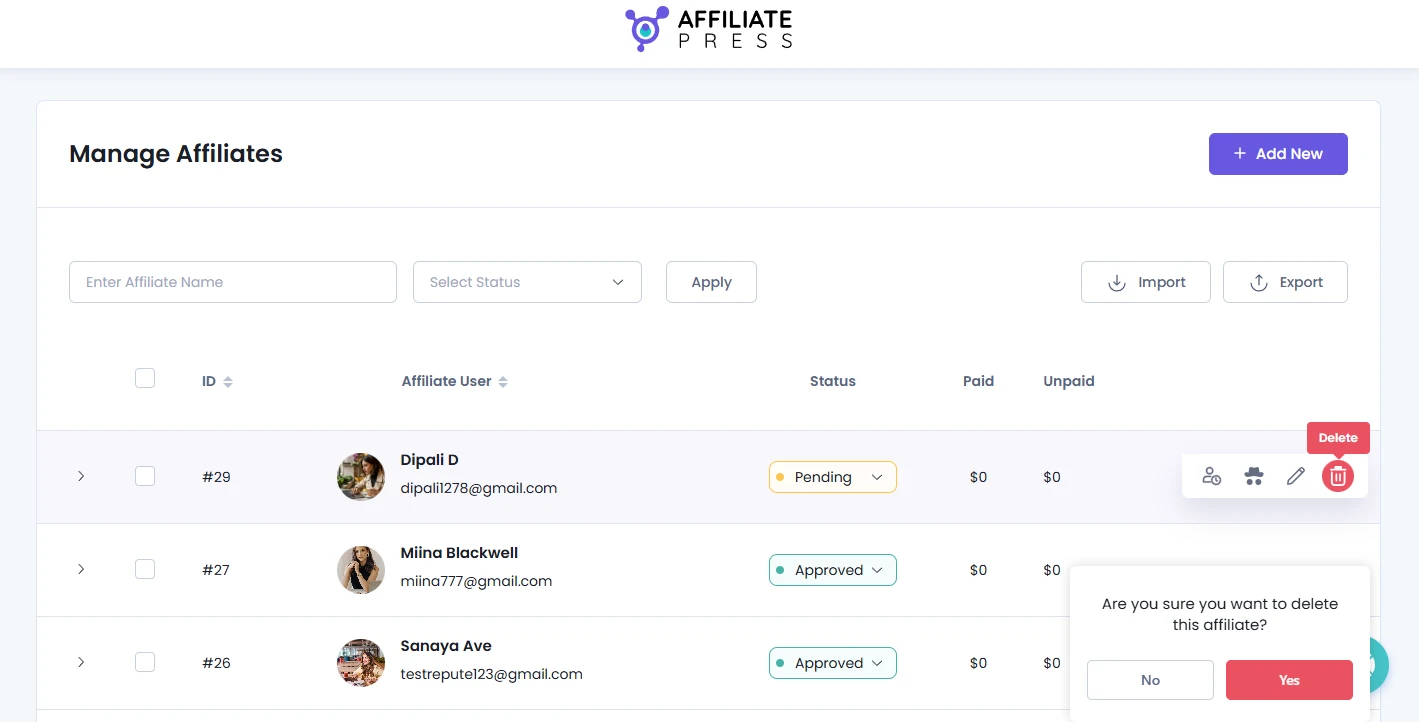
- If you want to continue, hit the Yes to confirm the deletion.
Note: Deleting an affiliate permanently removes their affiliate profile. Thus you must make sure you no longer need the affiliate before confirming the deletion.
How to Import and Export Affiliates
AffiliatePress lets you import affiliates in bulk using a CSV file, and also export your existing affiliate data for backup, migration or reporting purposes in just one click.
Import Affiliates
You can import new affiliate data into AffiliatePress by reaching the Import button at the top right corner of the Affiliates page.
Here, you’ll need to upload your comma separated (CSV) file containing your affiliate data. After the csv file is uploaded, map each AffiliatePress Affiliate field to the CSV column in your CSV file.
For each field, a dropdown will appear which allows you to easily map the corresponding data. On top of that, the dropdowns will be populated with the columns from your CSV, enabling accurate mapping of the data.
Just so you know, the email field is required to import affiliates.
Furthermore, any required field will be marked with a red * to show that they are mandatory. Mapping is compulsory for required fields, and custom fields set as required also shows the red * indicator.
If the Individual Affiliate Rate is enabled and a rate is added, the Individual Affiliate Rate is imported.
You can also import all affiliate data, including custom field data added through the Form Editor. The Group ID associated with each affiliate is also included in the exported file.
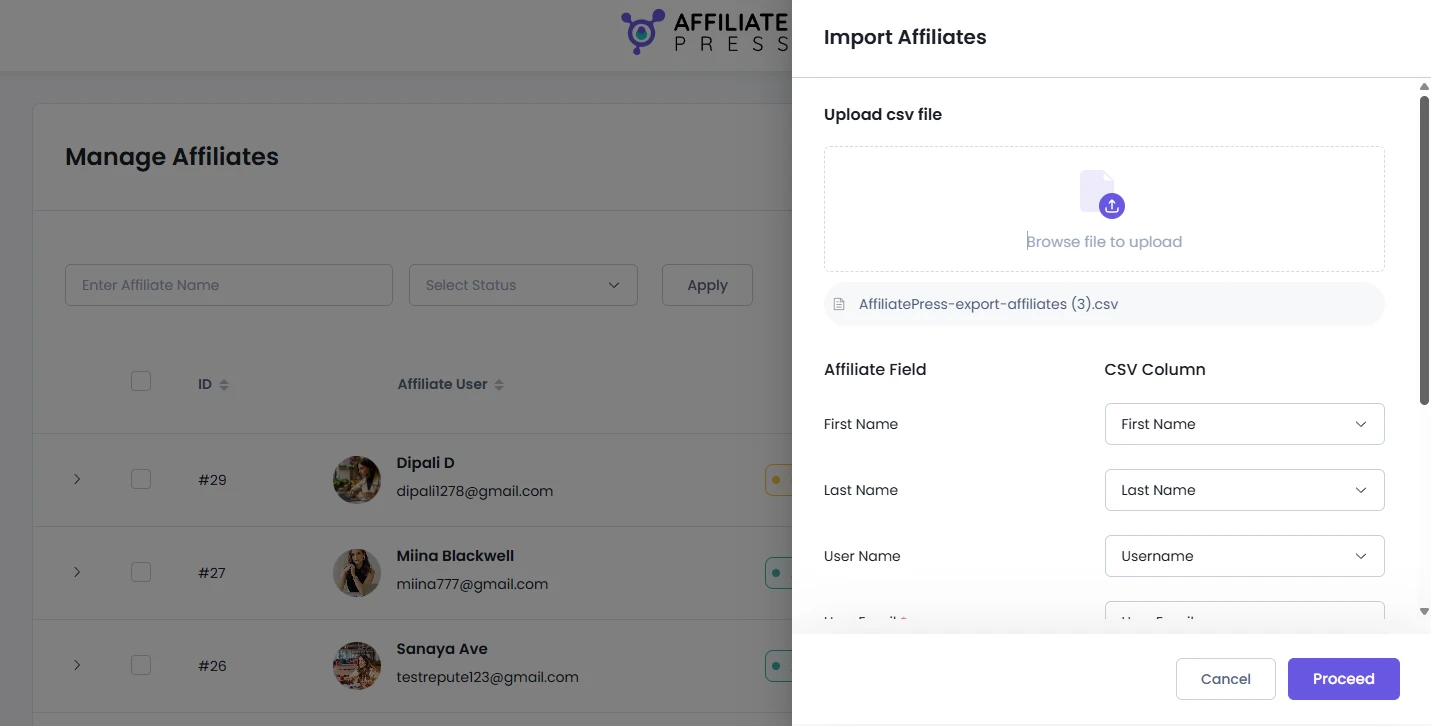
Always verify the field mapping is correct. If everything is mapped correctly, complete the import process with Proceed.
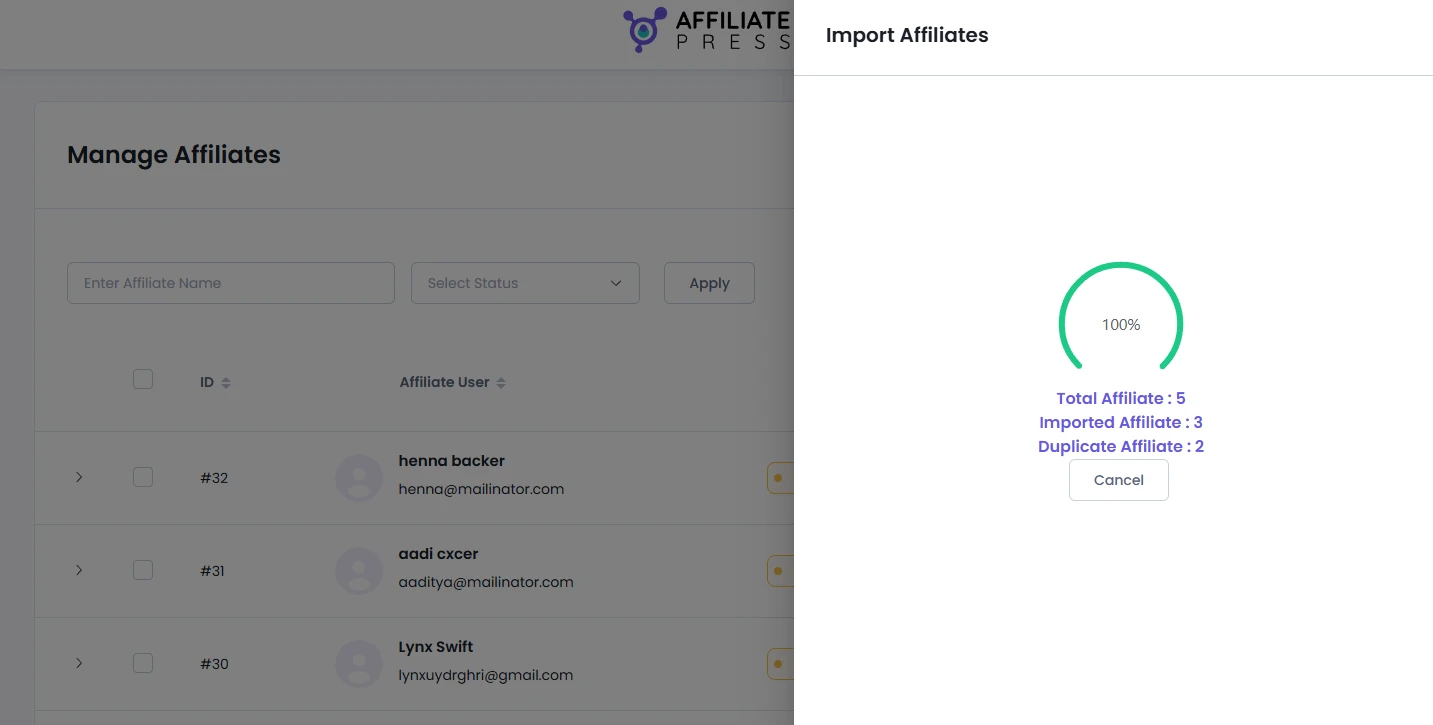
Once the data is imported completely, all the new data will be added inside the system. Also, it will show you the number of
- Total Affiliate
- Imported Affiliate
- Duplicate Affiliate
…to ensure all of your data is imported accurately and nothing’s missed.
Note: The User Email field is required when importing affiliates. The order of the columns in your CSV file does not matter, as you can map each field during the import process here.
Export Affiliates
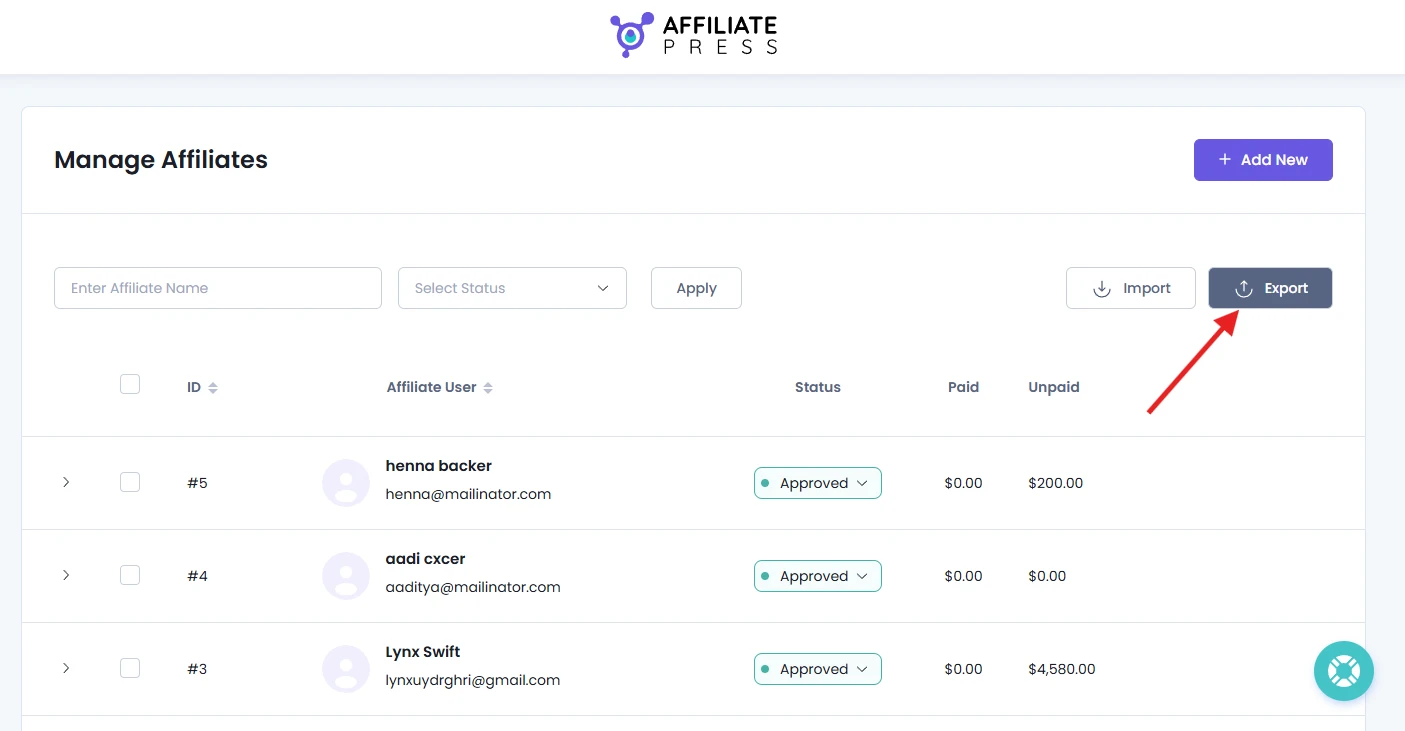
You can export your all affiliate data at any time for reporting, backup or migration purposes with just one click on the Export button at the top right corner of Affiliates page.
Just clicking on the Export button will automatically generate and download the CSV file of your affiliate data.
Affiliate Exported Data List
Here’s all affiliate data you get to export from the Affiliates page.
| Affiliate ID | Username |
| User Email | First Name |
| Last Name | Payout Email |
| Unpaid Earnings | Paid Earnings |
| Website | Status |
| Total Visit | Converted |
| How Will You Promote Us? | Date Registered |
| Group ID | Enable Affiliate Rate |
| Affiliate Rate | Affiliate Rate Type |
| Custom Fields Data (custom fields added through the Form Editor) |
You can later use this exported CSV file of your affiliate data as back up records or import them into another AffiliatePress installation if needed.