



Affiliate Form Editor
AffiliatePress lets you create custom affiliate registration forms and affiliate profile forms through a simple drag and drop form builder.
The Affiliate Form Editor is built into AffiliatePress which allows you to customize your affiliate form without writing a single line of code. You can add new fields, edit existing ones, reorder fields and personalize form messages to create a registration experience that matches your affiliate program.
In this guide we’ll show you how to customize affiliate forms using the Affiliate Form Editor.
What Can You Customize with the Affiliate Form Editor?
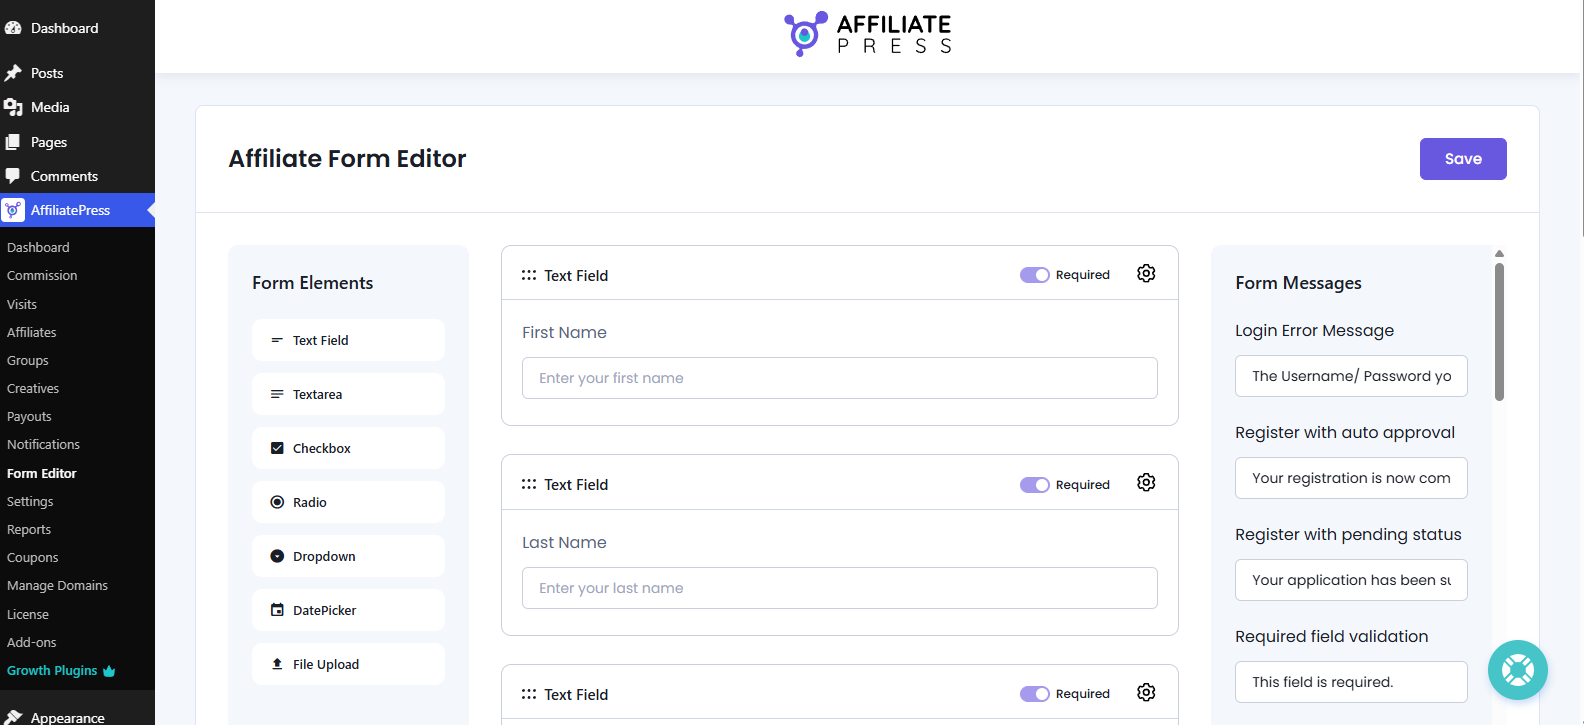
Reach to the AffiliatePress→ Form Editor and you’ll be able to:
- Create and customize affiliate registration fields
- Create and customize affiliate profile fields
- Edit labels and placeholders
- Reorder form fields with easy drag and drop
- Show or hide form fields
- Customize form messages
This lets you create a smooth affiliate onboarding experience that matches your affiliate program and branding.
Understanding the Affiliate Form Editor
To make it easier to customize your affiliate forms, the Affiliate Form Editor is divided into three main sections:
Form Elements Panel
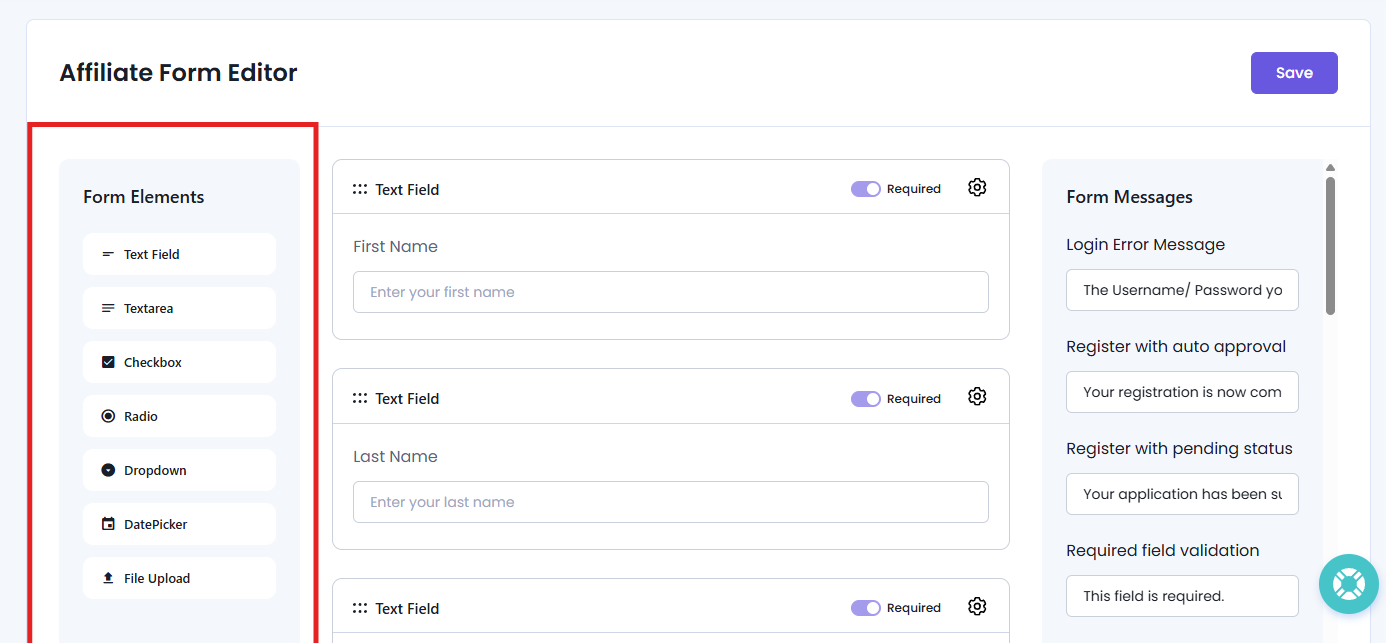
The Form Elements panel, located on the left side, has all the available form field types that you can add to your affiliate registration form.
Just click on the form field you want into the form builder, and start customizing.
Available Form Fields You Can Add:
- Text Field
- Text Area
- Checkbox
- Radio Button
- Dropdown
- Date Picker
- File Upload
Form Builder Area
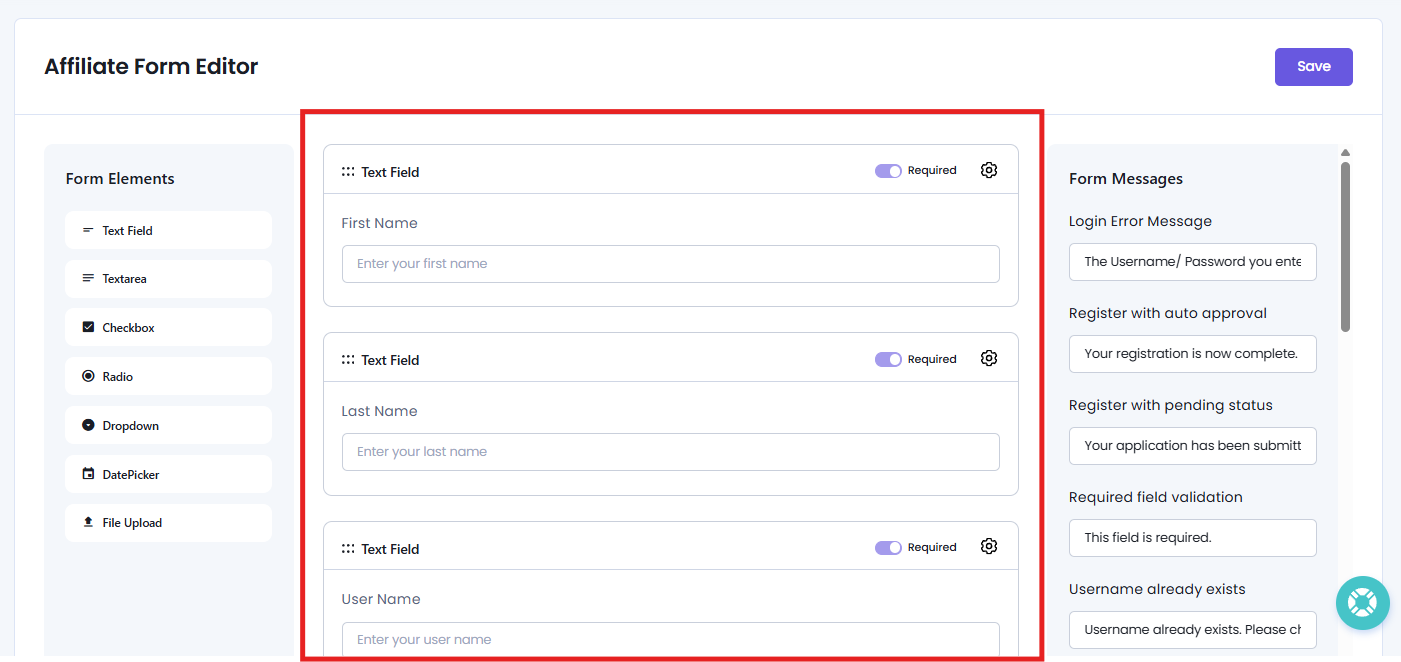
In the center of Affiliate Form Editor is the main workspace where you can build and customize your affiliate forms.
Important: Required system form fields cannot be deleted.
Here by default you’ll already have some form elements which are undeletable and required:
- First Name – Text Field
- Last Name – Text Field
- User Name – Text Field
- User Email – Email
- Password – Password
- Payment Email – Text Field
- Website – Text Field – Text Field (Optional)
- How Will You Promote Us? – Text Field (Optional)
- Terms and conditions
Apart from this, you can:
- Add new form fields
- Edit field labels and placeholders
- Mark fields as required or optional
- Reorder fields using drag and drop
- Open Field Settings using the Gear icon for additional customization
Don’t forget to click Save after making your changes to update your forms.
Form Messages Panel
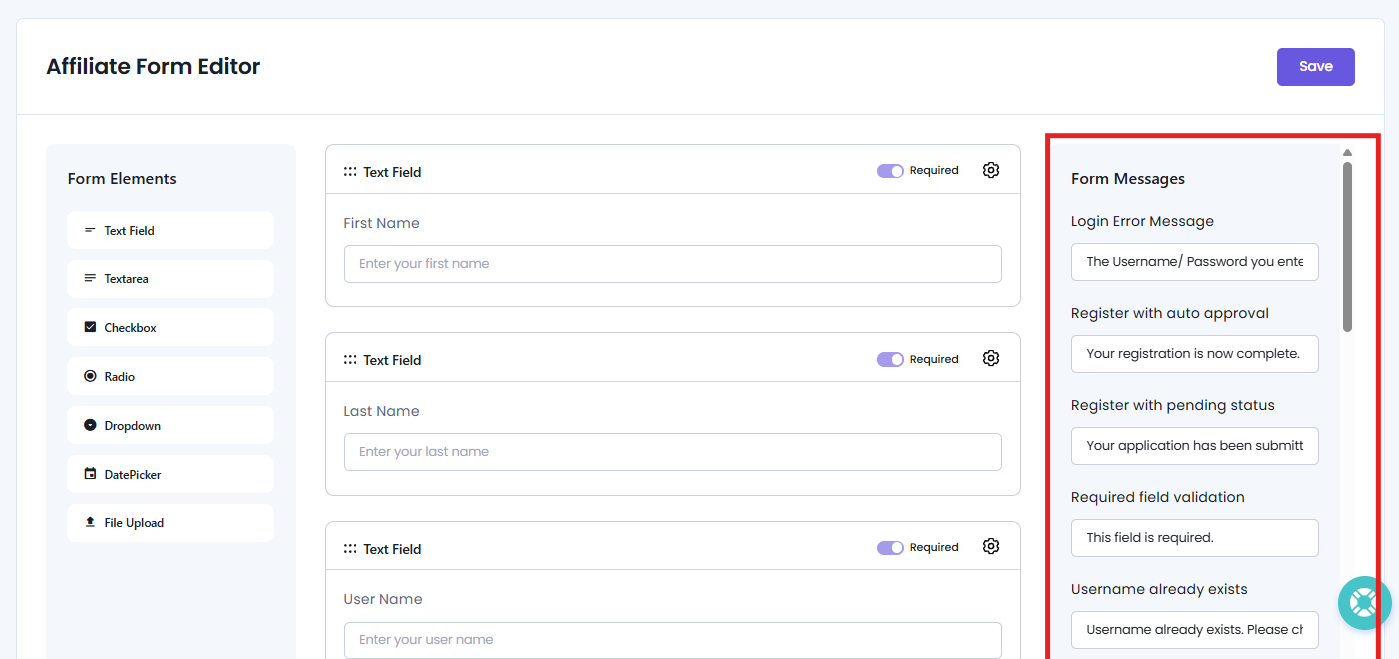
The Form Messages panel at the left side of Form Editor lets you customize the messages shown to affiliates during registration, login, password resets, profile updates and other affiliate related actions.
You can easily personalize these messages to match your website’s tone and offer a better affiliate signup experience.
How To Customize Your Affiliate Forms
The Affiliate Form Editor gives you complete control over your affiliate registration and profile forms. You can add new fields, edit existing ones, rearrange the field order, control field visibility and configure the Confirm Password field right from here, in just a few clicks.
Add Custom Fields to the Affiliate Registration Form
To add a new field, look at the Form Elements panel on the left side of the Form Editor. Simply click on the form field you want to add. This will add the new field at the bottom of the Form Builder area.
AffiliatePress supports the following field types:
- Text Field
- Textarea
- Checkbox
- Radio Button
- Dropdown
- Date Picker
- File Upload
Edit Existing Form Fields
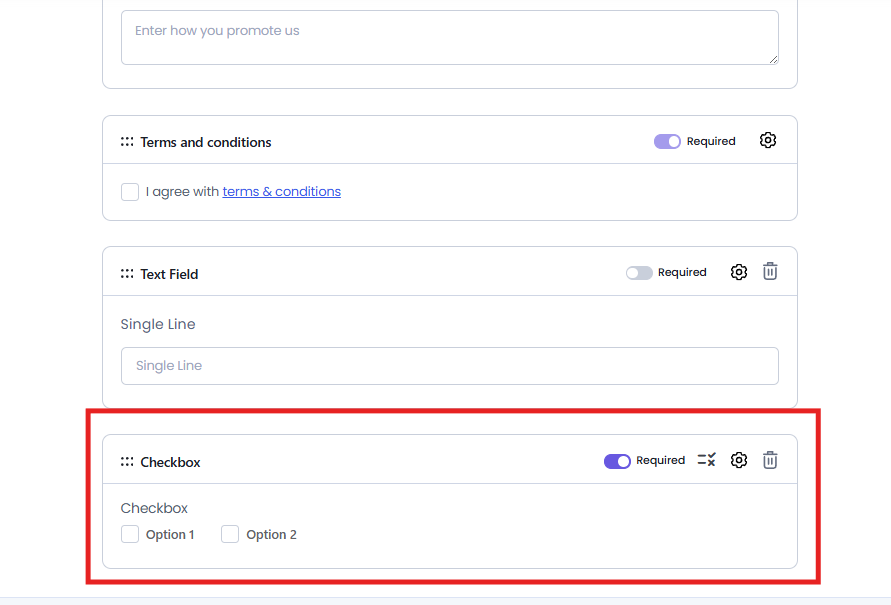
Once the new form fields are added, you’ll see options to add next to check added label such as:
- Required: You can Toggle it on to make the field Required for affiliates. They won’t be able to register without filling it.
- Field Option: If added a Checkbox, Dropdown, or Radio button, then only you’ll be able to see this option. Click on it to add the name of labels and options. You can also use separate values for each option by enabling “Use Separate Value”.
To edit an existing new Field Settings, click the Gear icon next to the field you want to modify. From the Field Settings panel, you can customize options such as below.
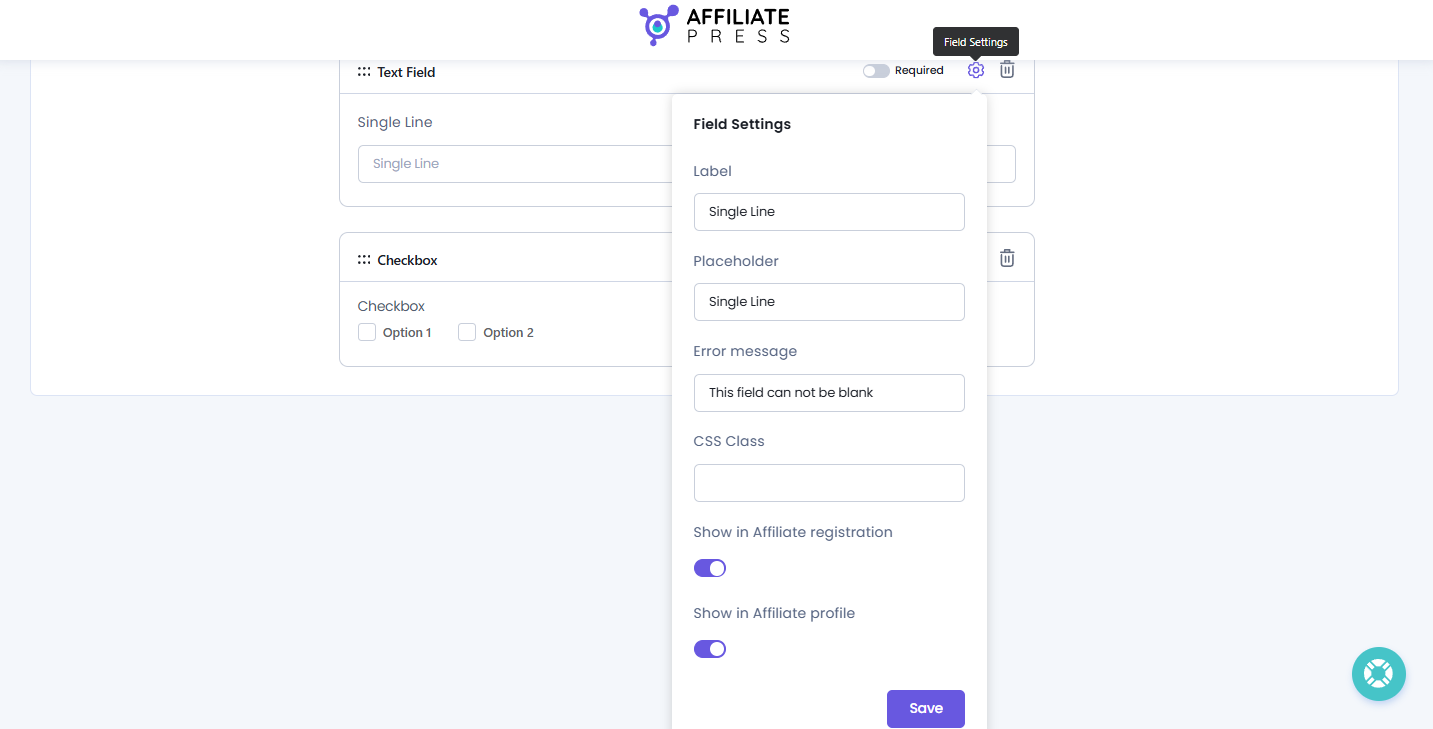
- Label
- Placeholder Text
- Error message
- Custom CSS Class
- Show in Affiliate Registration
- Show in Affiliate Profile
AffiliatePress allows you to control which fields appear on the Affiliate Registration Form and Affiliate Profile Form. Just toggle on/off the “Show in Affiliate Registration” and “Show in Affiliate Profile” to decide which field will be available where.
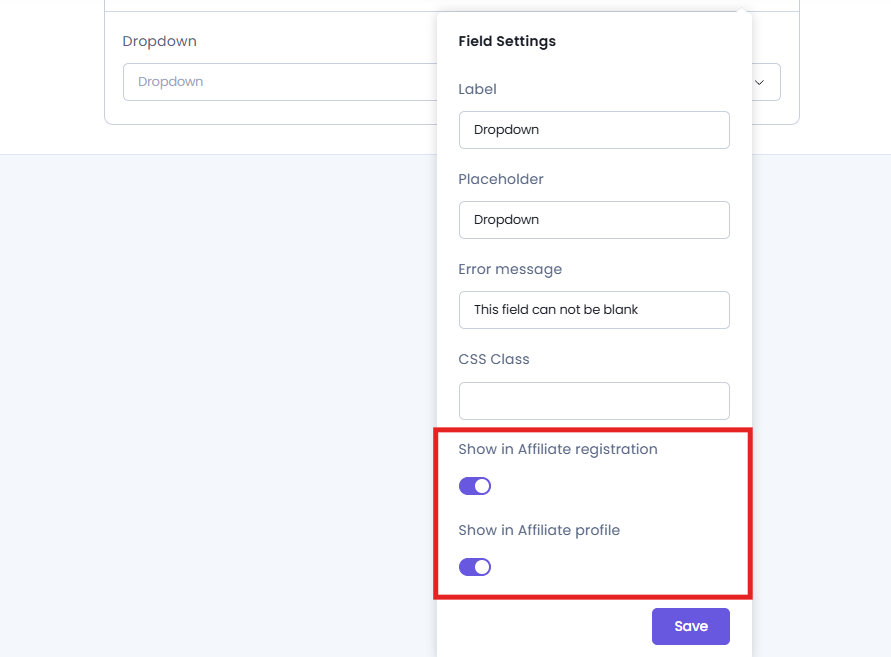
This is useful when you want to collect specific information only during affiliate registration or only when affiliates edit their profiles.
Plus, custom CSS classes are also useful when you’re styling your affiliate forms through your theme or custom CSS.
At last, click Save to update your Field Settings.
Reorder Form Fields
After your fields are ready, you can easily rearrange the order of them using the built-in drag and drop functionality.
Simply drag a field to its new position within the Form Builder. The updated order will be reflected on your affiliate registration and profile forms after saving the changes.
Configure the Confirm Password Field
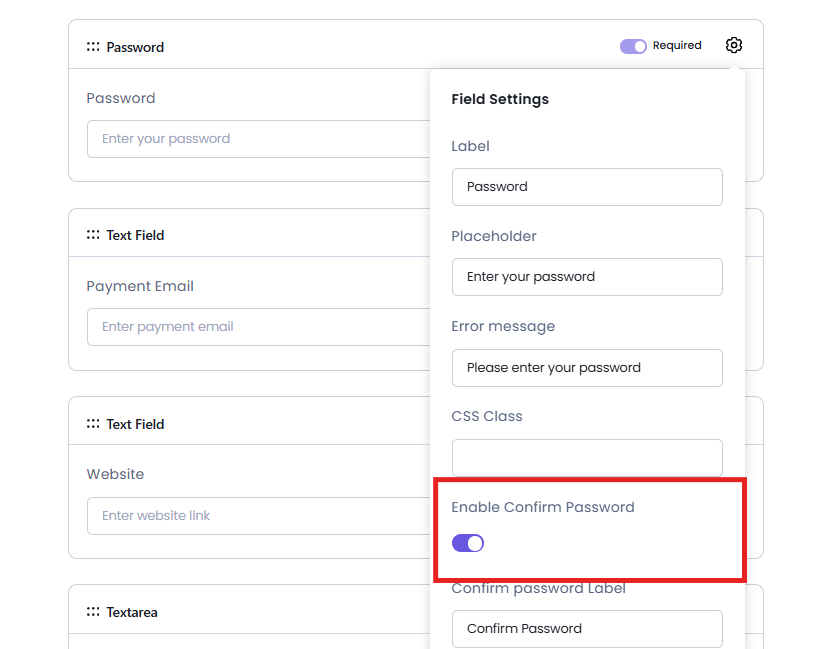
By default, the Confirm Password field is enabled for the Affiliate Registration Form to help users verify their passwords during registration.
To customize this field:
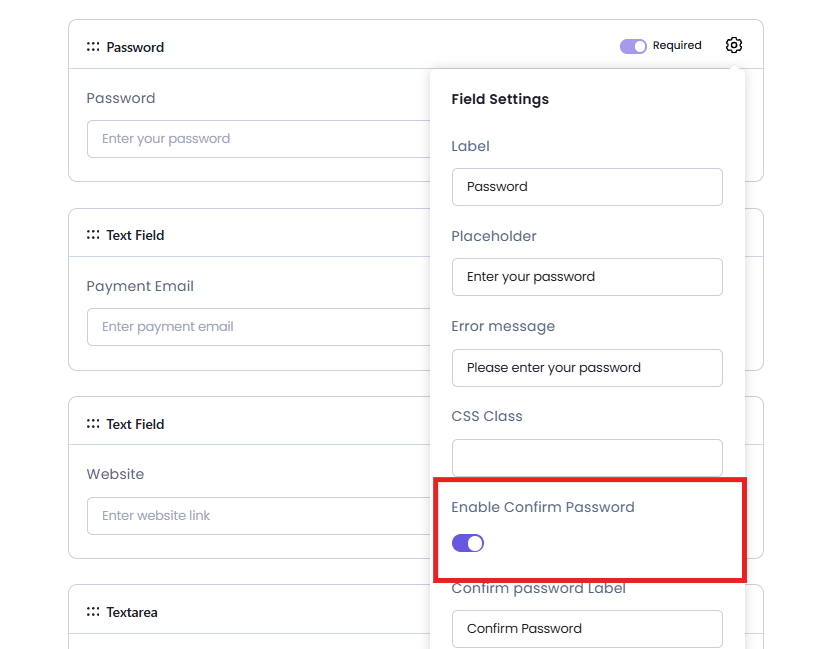
- Open the Field Settings for the Password field by clicking the Gear icon.
- Inside the Field Settings of Password field, toggle on the “Enable Confirm Password” option.
- After enabling confirm password, you can customize its field label, placeholder as well as validation and error message if needed.
- Click Save to confirm your changes.
Delete Form Fields
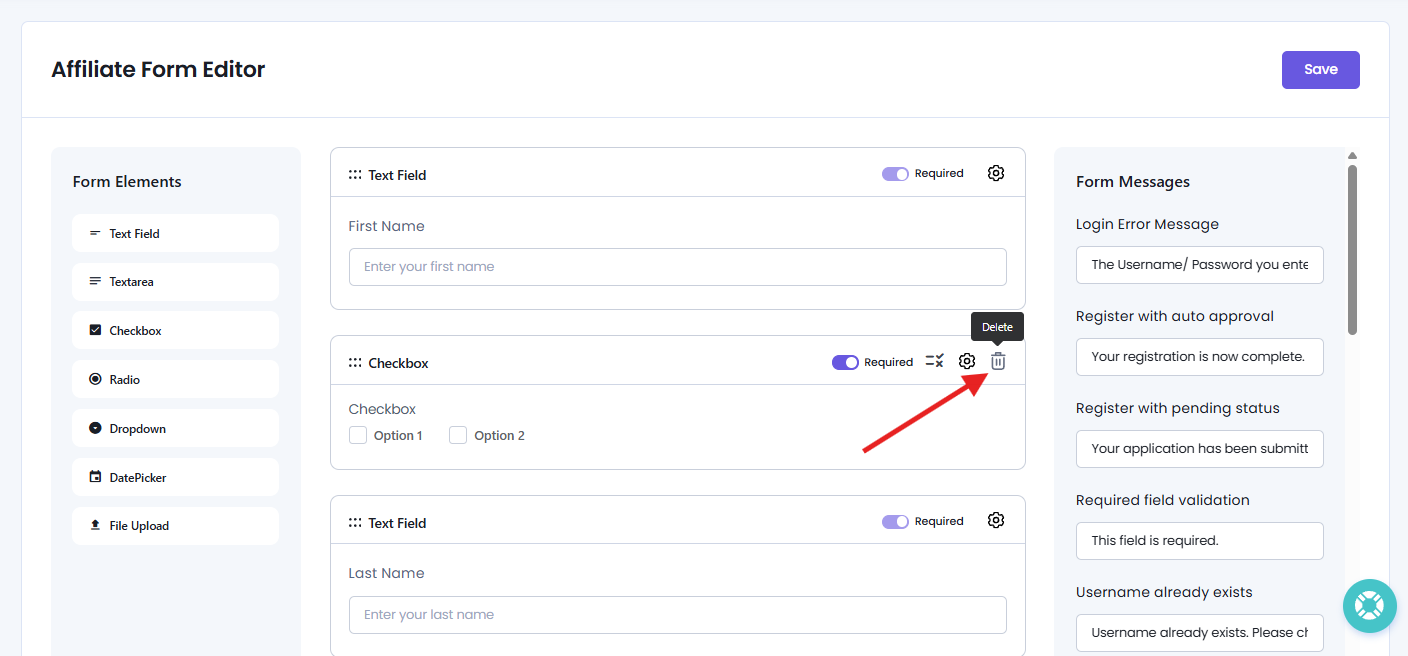
As discussed earlier, you can’t delete the default form fields, added already by the system.
However, you can surely delete the new form fields you added by mistake or just no longer need. Look for the form field you want to delete. Over the field, simply click the Delete icon. This will delete the form field immediately.
Note: Deleting a custom field permanently removes it from the registration form and the Form Editor. After deletion, the field and its previously collected values are no longer accessible from anywhere panel.
How to Customize Form Messages
AffiliatePress lets you customize the messages shown to affiliates during registration, login, password resets, profile updates and other affiliate related actions.
Although there are messages by default, customizing these messages makes them more personalized, provides clearer instructions and maintains a consistent experience across your affiliate program.
To customize a form message:
- Inside the Affiliate Form Editor, look at the Form Messages section at the left.
- Scroll till you find the message you want to edit.
- Now just replace the default text with your preferred message.
- Lastly, click Save at the top right corner of the form for all changes.
Here are all the customizable form messages:
Registration & Login Messages
| Message | Purpose |
| Register with Auto Approval | Shown after a successful registration when affiliate accounts are approved automatically. |
| Register with Pending Status | Shown after registration when affiliate approval is required. |
| Affiliate Registration Disabled | Shown when affiliate registrations are disabled. |
| Affiliate Account Already Registered | Shown when an existing affiliate attempts to register again. |
| Not Allowed Affiliate Registration | When a user isn’t allowed to access the affiliate registration page,this message will be shown |
| Login Error Message | An incorrect username or password is entered. |
| Login is Not Allowed | Shown when an affiliate isn’t permitted to log in. |
| Wrong Email/Username | Displayed when no affiliate account matches the entered email address or username. |
| Affiliate Pending Account Login | Displayed when an affiliate tries to log in while their account is still pending approval. |
| Affiliate Account Blocked | Displayed when an affiliate account has been blocked by the administrator. |
Validation & Password Messages
| Message | Purpose |
| Required Field Validation | Alerts users when a required, must-fill field is left empty. |
| Username Already Exists | Informs users that the chosen username is already in use. |
| Email Already Exists | Lets users know the email address is already registered. |
| Password Reset Link | Confirms that a password reset link has been sent. |
| Incorrect Current Password | Indicates that the current password entered is incorrect. |
| Mismatch Passwords | Warns users when the new password and confirmation password don’t match. |
| Password Successfully Updated | Confirms that the password has been updated successfully. |
Profile & Affiliate Messages
| Message | Purpose |
| Profile Fields Successfully Updated | Confirms that profile changes have been saved successfully. |
| Account Closure Request Success | Lets users know their account closure request has been submitted. |
| Affiliate Custom Link Added | Confirms that a new custom affiliate link has been created. |
| Campaign Name Already Added | Warns users that the campaign name or Sub ID already exists. |
| Affiliate Link Limit Reached | Informs users that they’ve reached the maximum number of custom affiliate links. |
| Affiliate Link Deleted | Confirms that the selected affiliate link has been deleted. |
| Affiliate Link Copied | Confirms that the affiliate link has been copied to the clipboard. |
File Upload & CAPTCHA Messages
| Message | Purpose |
| Avatar Invalid File Type Message | Appears when an unsupported avatar file format is uploaded. |
| Avatar File Size Limit Message | Appears when the uploaded avatar exceeds the maximum file size limit. |
| hCaptcha Verification Failed | Informs users that hCaptcha verification was unsuccessful. |
| reCAPTCHA Verification Failed | Shows users that reCAPTCHA verification was unsuccessful. |
Tip: Keep your messages short, clear and action oriented so affiliates understand what happened and what they need to do next without confusion.