

How to Set Up an Affiliate Program in 15 Minutes Using AffiliatePress
AffiliatePress provides you with a simple affiliate program setup wizard, designed to get you going in under 15 minutes, step by step. But naturally, for more complex WordPress setups, you can spend a bit more time.
In today’s tutorial, we’re providing a detailed tutorial for creating an affiliate program on WordPress with AffiliatePress.
Before you ask… yes, you can use AffiliatePress for free (install the free version here – it works with 25+ plugins!), but keep the limitations in mind.
In this tutorial, we’re showing many capabilities of the premium versions.
TL;DR: You can start by setting up your affiliate program with AffiliatePress in just a few simple steps. Configure commissions, payouts, affiliate registrations and tracking to launch a full-power WordPress affiliate system immediately.
Step 1. Install AffiliatePress and Activate Your License (5 Minutes)
Before moving on, make sure you already have:
- A working WordPress site.
- SSL enabled (HTTPS is important for affiliate tracking reliability).
- Your eCommerce or membership plugin installed (WooCommerce, SureCart, LearnDash, etc.).
Next, install the plugin and activate its license:
- First, install AffiliatePress on your WordPress website.
If you already purchased a premium plan, upload the plugin ZIP file and activate your license key via AffiliatePress → License.
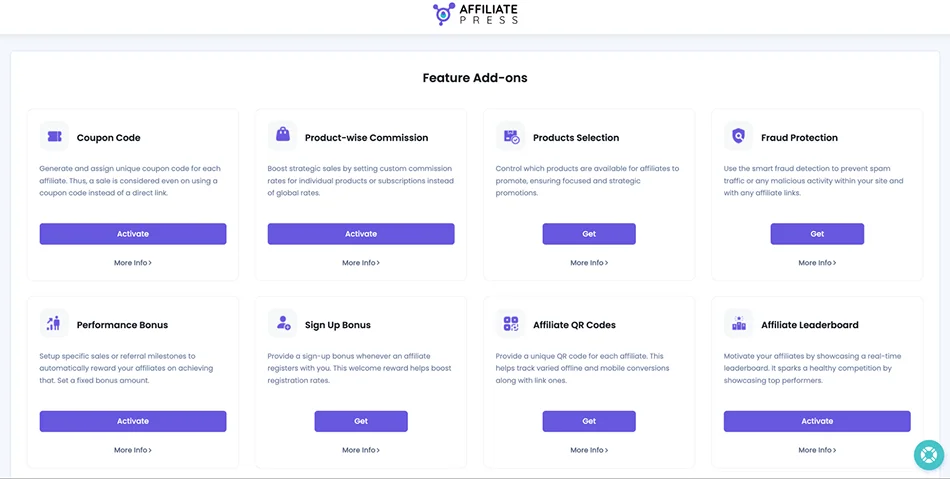
- After activation, log into your AffiliatePress account and download any addons you plan to use.
We recommend downloading and installing all the add-ons – but activating them only when you need specific options. Gonna save you some ‘account log-in and log-out’ time.
Step 2. Run the AffiliatePress Setup Wizard (5-10 Minutes)
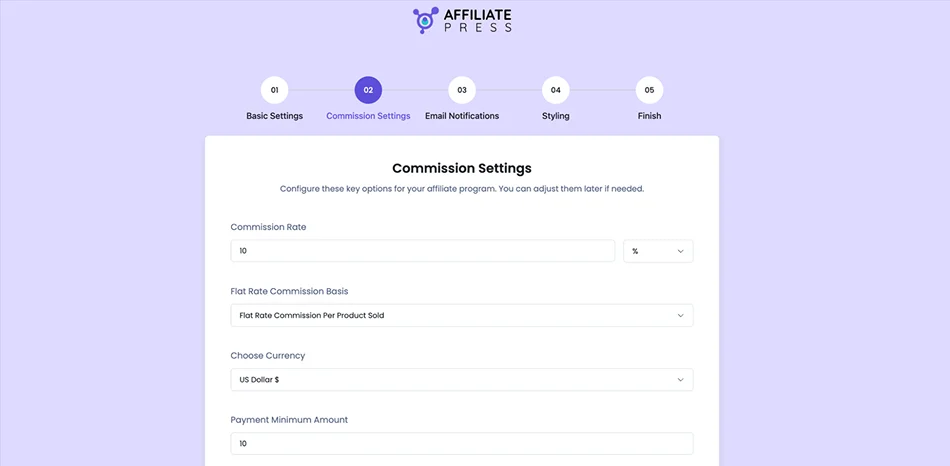
There is a handy setup wizard that you can launch to create a lean affiliate program setup in under 15 minutes (prompted upon plugin activation).
The wizard guides you through:
- Commission settings
- Payment preferences
- Affiliate registration basics
- Essential tracking configuration.
We recommend this for beginners, as this is the fastest way to launch a functional affiliate program.
Also, if you don’t want to delay your launch and have the “perfect” commission structure in place from day one, use the wizard.
The wizard gives you a solid starter setup with all the essential settings already in place, so you don’t miss anything important. You can then customize and expand your affiliate program further whenever you’re ready – or even right away.
Step 3. Configure Your Affiliate Program Basics (5-10 Minutes)
No matter whether you use a wizard or do it all manually, you want to check and customize tracking, currency, and more via General settings.
1) Go Through General Settings
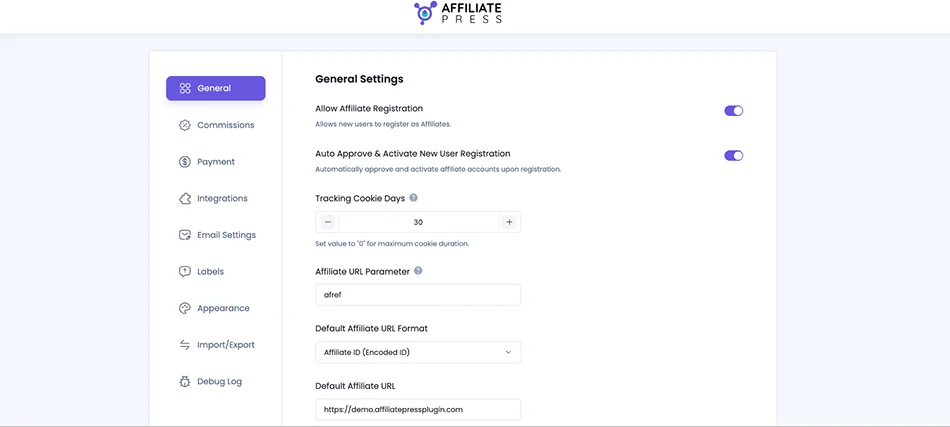
Go go AffiliatePress → Settings → General
If you use a wizard, some of the settings are already configured. But here you can add more configuration for your day-to-day work.
- Enable affiliate registrations: Turn on Affiliate Registration to allow users to apply directly through your website.
- Optional: If you want to auto-approve affiliates, enable ‘Auto Active Upon Registration’. It instantly activates new affiliates after signup.
When to use auto-approval? You may want to test how it works for your site, but generally…
Good for:
- smaller trusted communities,
- invite-only programs,
- creator partnerships.
Avoid it for:
- public signup programs,
- coupon-heavy niches,
- high-fraud industries.
Affiliate spam can be an issue on WordPress sites, so consider manual approval as a time saver that prevents fake affiliates and low-quality traffic. Moreover, if you are switching from another plugin, you can simply import affiliates to AffiliatePress.
2) Configure Affiliate Tracking
Configure tracking preferences for affiliate sales. Cookie duration (how long referrals remain active) is also important.
Examples:
- 7 days (impulse purchases)
- 30 days (common default)
- 60–90 days (high-ticket services or courses)
A 30-day cookie window is a proven tactic for many programs.
Then, your cornerstone – affiliate links. AffiliatePress lets you customize referral parameters, create cleaner links, and enable Fancy URLs.
Fancy URLs look more trustworthy and are easier for affiliates to share on social media or YouTube descriptions – since these look more like branded URLs.
Such affiliate links are also more trusted in email marketing and social campaigns.
3) Configure affiliate account behavior
In this menu, you may allow affiliates to close accounts and automatically generate affiliate profiles for new WordPress users.
Automatic affiliate account creation works especially well for membership sites and online communities.
4) Set Your Currency
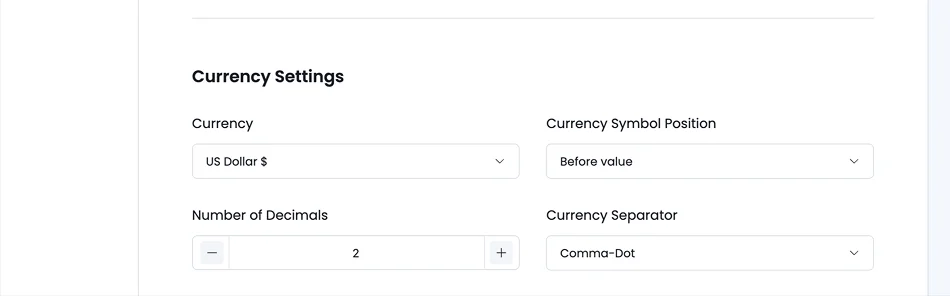
Choose the primary currency for commissions, reports, and payouts. Match this to your payment processor whenever possible to avoid any accounting issues.
5) Assign Affiliate Pages
Select the WordPress site pages for Affiliate Dashboard and Affiliate Registration.
If you skipped this during setup, now is the time to connect those pages properly (you might need to create them first if you don’t have any).
6) Enable CAPTCHA Protection (Recommended)
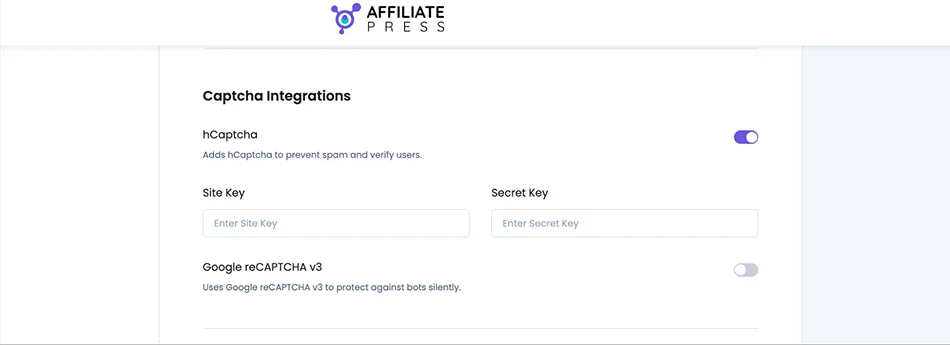
Activate Google reCAPTCHA or hCaptcha, which is crucial for affiliate sites that deal with many client-facing user submissions (each one requires adding your credentials). This helps block fake affiliate registrations and bot spam.
Step 4. Configure Commission Settings (10-20 Minutes)
Having your commission structure drafted in advance makes this step much faster, since you can simply copy those settings into AffiliatePress.
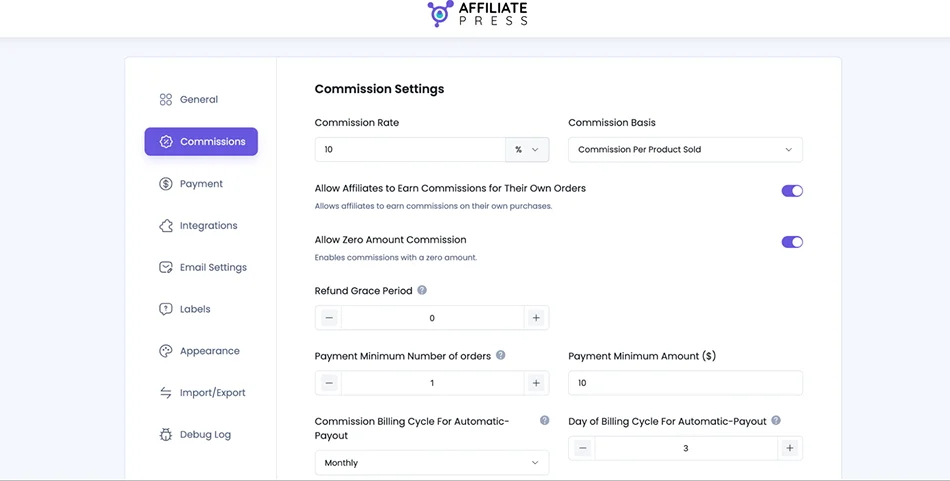
Go to AffiliatePress → Settings → Commissions
1) Set up basic settings
Time to define how affiliates earn money. Customize your default commission structure using:
- percentage commissions,
- fixed commissions,
- per-product payouts,
- per-order payouts.
Common examples:
- Digital products: 30-50%
- Physical products: 5-15%
- Memberships/SaaS: recurring or hybrid commissions
With extra add-ons enabled, you might see more settings. For example, if you use the Recurring Commissions add-on from AffiliatePress, you’ll also be able to set rules for it. If you want to have performance-based milestones, you’ll need to activate the Tiered Commissions Rates add-on and set up the levels.
Discover multiple commissions types in AffiliatePress.
2) Set up advanced settings
AffiliatePress also lets you control self-commissions, which allows affiliates to earn from their own purchases. Can work for influencer discounts, ambassador programs, and creator partnerships.
You may also use ‘Zero commission tracking’ when you want to track referrals without paying commissions, just to measure performance or test campaigns.
3) Add refund grace period
Using the ‘Refund grace period’ configuration, you can delay commission approvals until your refund window expires. If you sell online courses, digital downloads, or subscriptions, make sure to set up this period! Otherwise, you may end up paying commissions on refunded orders.
4) Add ‘Minimum payout threshold’
Set a minimum payout amount like:
- $25,
- $50,
- or $100.
5) Schedule automatic affiliate payouts
Schedule weekly, monthly, or yearly payouts. Most affiliate programs use monthly payouts because it leaves enough time to handle refunds and fraud reviews.
6) Customize last-click attribution
Enable ‘Last Referrer’ to credit the most recent affiliate link clicked before purchase.
7) Product-specific commissions
If you use WooCommerce or another supported integration, you can set custom commissions per product.
Based on which AffiliatePress add-ons you might have already enabled, you might see more settings.
Step 5. Set Up Affiliate Payouts (5-10 minutes)
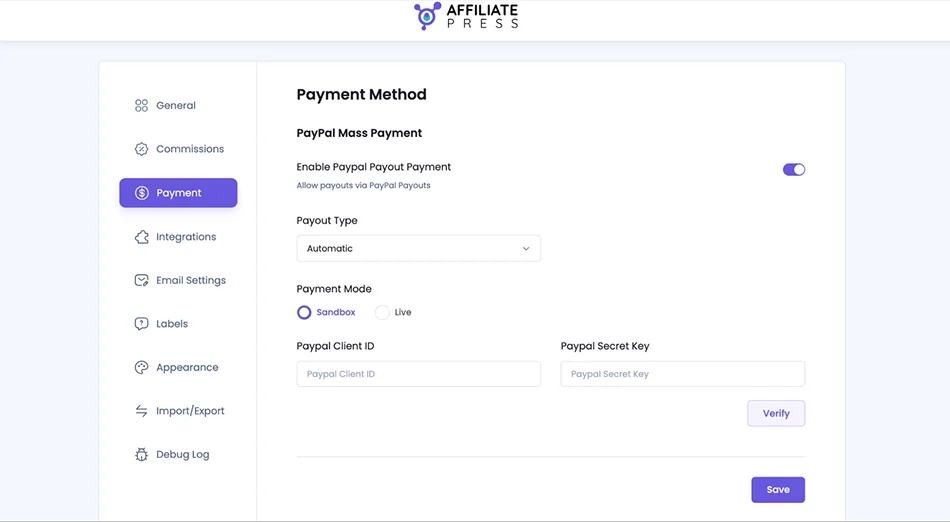
AffiliatePress supports payouts through PayPal and Stripe, which you can set up via AffiliatePress → Settings → Payments.
Here, you can connect your payment accounts using the required API keys.
Choose manual or mass payouts
Manual payouts work when:
- You just got started.
- You have a smaller program.
- You want to have better fraud control.
Mass payouts are fine for:
- larger affiliate programs,
- recurring monthly payout cycles,
- scaling operations.
Many site owners start with manual payouts for the first few months while they learn affiliate behavior patterns and monitor fraud risks.
Step 6. Connect Your WordPress Plugins and Integrations (5-15 Minutes)
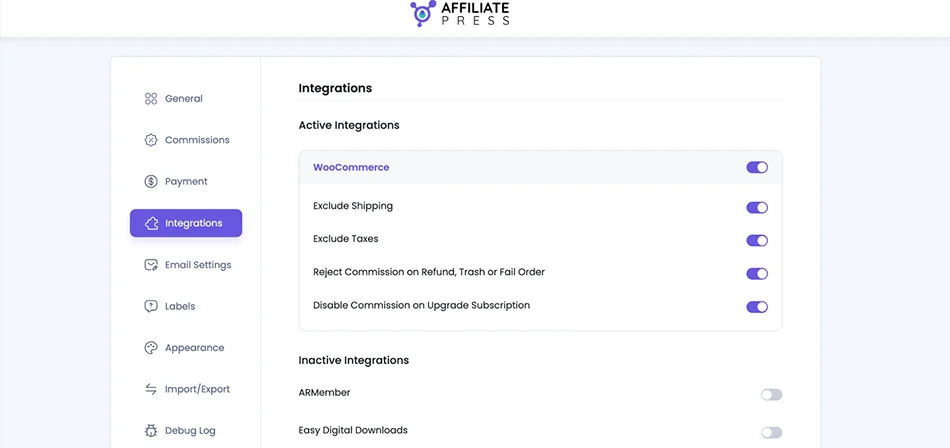
This is where you connect your sales touchpoint to AffiliatePress. The WordPress plugin / plugins should already be up and running.
Go to AffiliatePress → Settings → Integrations
Here, you can enable the plugins you want AffiliatePress to track as affiliate sales. Many plugins are supported, including:
- WooCommerce
- SureCart
- Easy Digital Downloads
- MemberPress / Restrict Content Pro
- LearnDash / LifterLMS / Tutor LMS / Masteriyo LMS
- BookingPress
After enabling integrations, always perform a real test purchase using an affiliate link. Tracking issues are usually easier to fix early before affiliates start promoting.
Step 7. Configure Affiliate Emails and Notifications (10-15 Minutes)
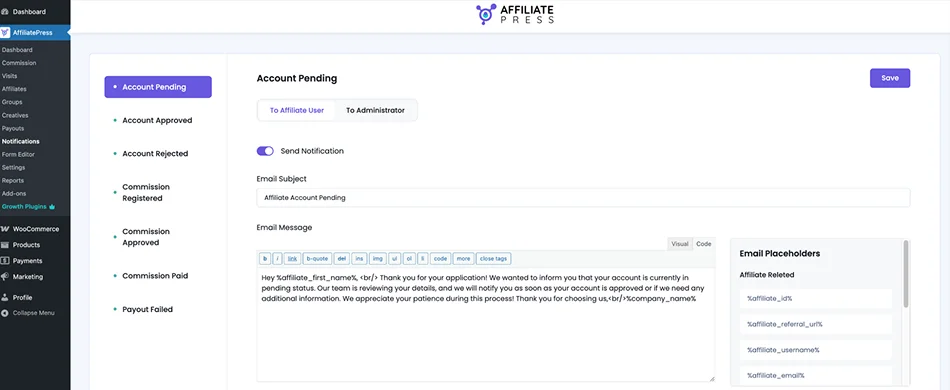
Make sure that communication is set up in both ways – for you and your partners.
Go to:
- Settings → Emails
- AffiliatePress → Notifications
There, you will find templates to customize for:
- affiliate welcome emails,
- approval notifications,
- commission alerts,
- payout confirmations.
The task of automated emails is to reduce any work for your – explanations, onboarding, accounts, commissions, etc. Let the emails do the work.
What should your first emails focus on? Affiliate emails should explain next steps clearly, provide account information, provide referral links, and encourage affiliates to start promoting quickly.
The faster affiliates receive usable links and promo assets, the more likely they are to actually promote your products.
Step 8. Customize Your Affiliate Program Branding (5-10 Minutes)

AffiliatePress also allows you to make all the dashboard and registration experiences fully custom.
Go to AffiliatePress → Appearance
You can customize:
- labels,
- dashboard wording,
- affiliate panel text,
- colors,
- typography.
Simple branding improvements increase trust. Affiliates are more likely to actively promote programs that look polished and professional.
Step 9. Create Affiliate Groups (5 Minutes)

In AffiliatePress, you can set custom commission rates per product, individual partner – as well as partner groups. Affiliate groups help you organize partners and assign custom commission rates based on specific rates.
Go to AffiliatePress → Groups to create one.
Common group examples
- VIP affiliates
- Influencers
- Course partners
- Agencies
- Brand ambassadors
You can create a group by:
- Clicking Add New
- Naming the group
- Assigning custom commission rules
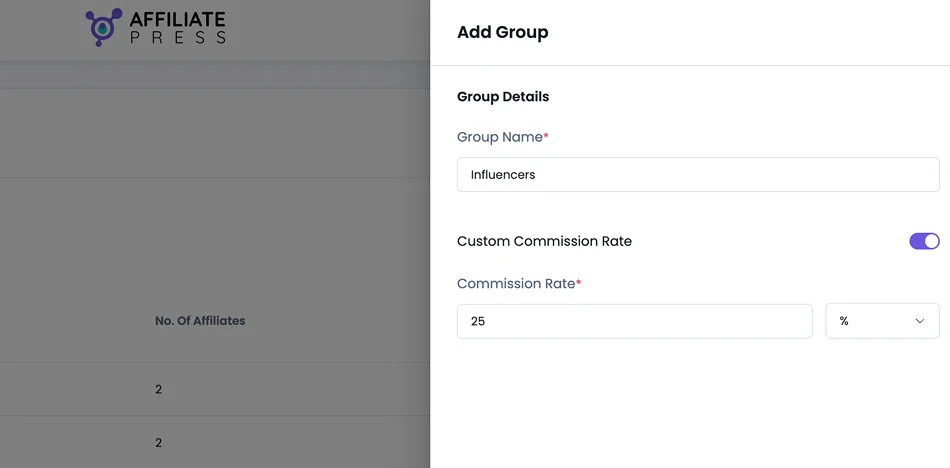
Using groups, you can easily set better commission rates over time for those who expect it, as well as apply standard commissions to regular bloggers.
Step 10. Build Affiliate Registration Pages and Forms (10-15 Minutes)
Now, it’s time to add affiliate registration forms to your WordPress site.
Go to AffiliatePress → Form Editor
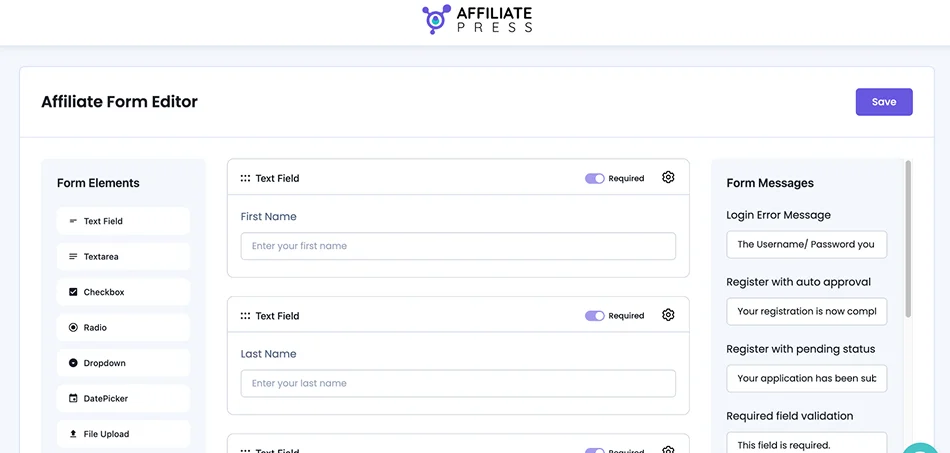
In this menu, you can easily customize signup forms, which fields to include, etc. In addition to the name and email fields, ask for payment details and promotional methods to be sure that this is ‘your client’.
Then, add affiliate pages to WordPress with AffiliatePress blocks or shortcodes. Key shortcodes include:
- Affiliate Dashboard
- Affiliate Registration
- Creative
Add them to any WordPress page you want. We also recommend testing the full registration process yourself from a private browser before launching publicly.
Optional Extra Steps
Not every program needs all the add-ons or features, but in case you plan to use maximum capabilities, here are the tools you can use.
Upload Affiliate Creatives and Promo Assets
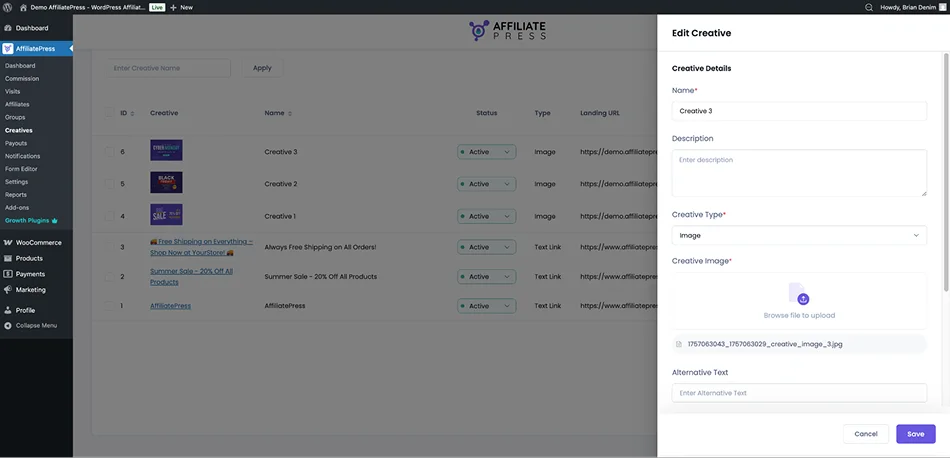
Go to AffiliatePress → Creatives if you want to instantly upload helpful assets for partners. Of course, this is not an essential step for the first setup.
However, you can upload banners, text links, promotional images, and campaign graphics later. Such things really help affiliates get started quicker.
Create Affiliate Landing Pages
The Affiliate Landing Page add-on is a tool to assign specific WordPress pages or posts directly to individual affiliates. It’s an awesome opportunity to allow referral to be automatically tracked to the assigned affiliate without link clicks.
Create Sign-Up Bonuses, QR Codes, and More
For specific affiliates or specific needs, you may use add-ons to build QR codes, sign-up instant bonuses, and introduce other incentives.
Learn to Analyze Your Affiliate Program With AffiliatePress
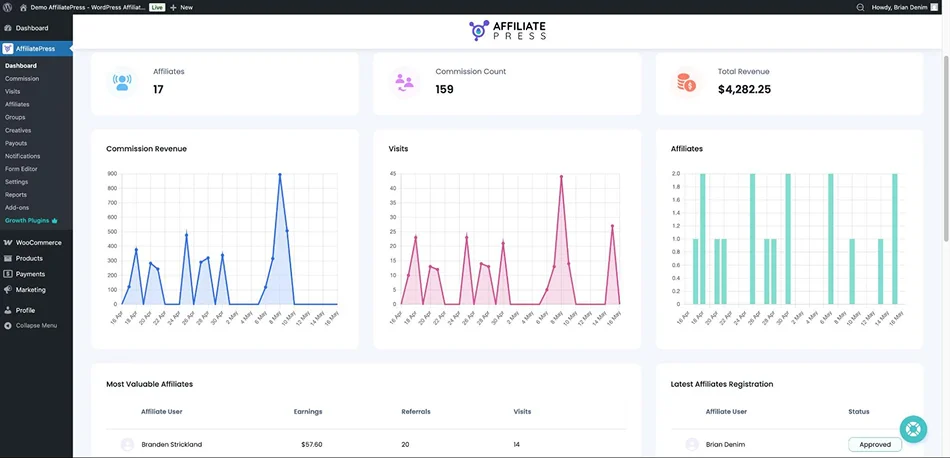
You might also need some time to learn the basics of the AffiliatePress central affiliate management dashboard, where you monitor clicks, referrals, affiliate performance, payouts, conversion rates, and campaign performance.
You’ll be using a few different menus, including Reports.
The first 30-60 days of an affiliate program are mostly about observation:
- Which affiliates actually send traffic?
- Which traffic converts?
- Which commissions remain profitable?
Concluding: Create an Affiliate Program in WordPress Really Quickly
With AffiliatePress, you can create and launch a basic affiliate program for a store, membership site, or online course platform in under 15 minutes using the setup wizard. It creates a basic version of a turnkey setup.
If you want to build a more advanced system – for example, set different commissions for affiliates, products, or groups, or even create an MLM structure – you can still configure everything in AffiliatePress in under an hour if you already have your rules prepared in advance.
Overall, the more prepared you are, the faster you can launch your affiliate program on WordPress! Either way, AffiliatePress makes the process quick and straightforward!
Related articles: