


Essential Fields for Affiliate Registration Forms That Convert
For an affiliate program that runs online for your site and is tied to online payments, you always need an affiliate registration form. And it’s far more than a simple sign-up page.
It’s the starting point for many real interactions with your partners, your policy statements, and the foundation of your future relationships.
If you’re running your affiliate program using software, it’s important to understand that the affiliate registration form is part of that software’s capabilities.
The software defines what can be built, but you decide which fields are included, how strict they are, and what information you collect. In other words, a tool like an affiliate management plugin gives you the framework, but the strategy is yours.
In this blog, we want to walk you through
- How to think about affiliate registration forms from both a business and UX perspective.
- How different business models influence form structure.
- Which fields are essential.
We’ll also get our hands dirty with a real affiliate registration form and learn how you add it to a WordPress site using AffiliatePress.
Why the Affiliate Registration Form Matters More Than You Think
The affiliate registration form is not there to just get new partners on board.
It serves several purposes at the same time:
- Filtering is about deciding who should (and shouldn’t) become an affiliate (you give them an idea if this works for them).
- Positioning – setting expectations for how your affiliate program works.
- Finally, data collection (gathering information you’ll actually need to manage affiliates later).
Not all affiliate registration forms should look the same, and that’s intentional. The products or services you sell directly affect how selective your form should be and what data you need to collect. Let’s talk about it!
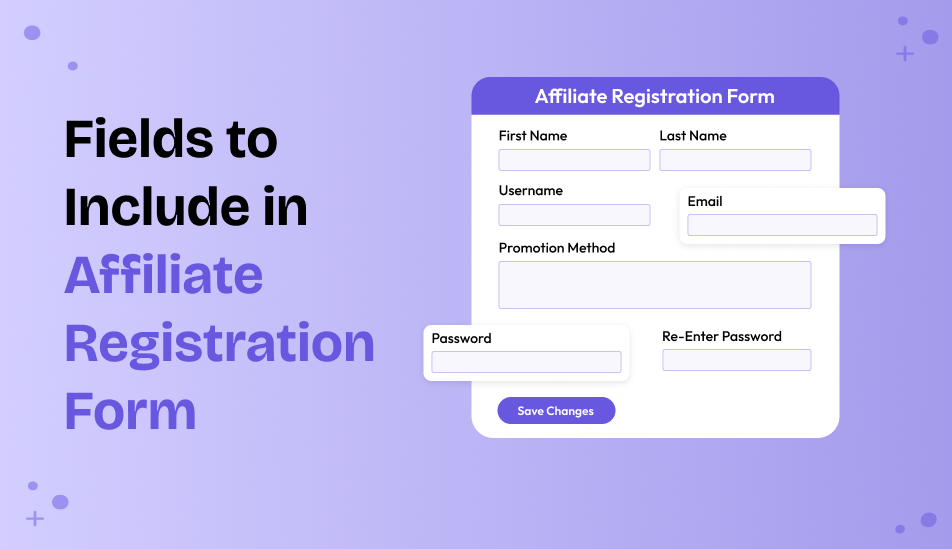
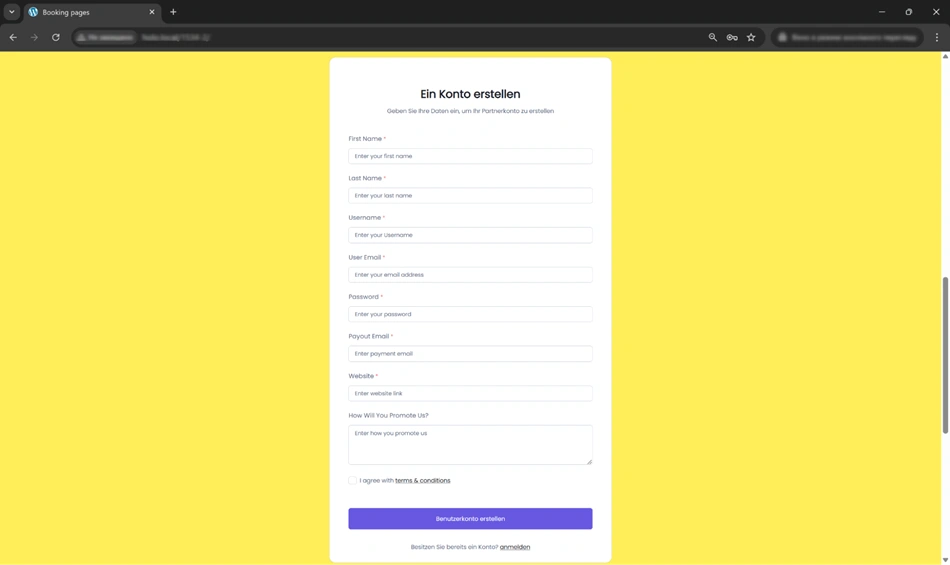
Top Fields to Include in an Affiliate Registration Form (Common & Optional)
So, what are the most common and essential fields for an affiliate registration form?
These appear in nearly all affiliate registration forms:
- Name and email: communication and account setup.
- Login credentials: affiliate panel access [can be auto generated by some software]
- Website or promotion channel: understanding traffic sources.
- Payment details: commission payouts.
These fields are literally essential as they focus on functionality and ease of use. These are fields prospective affiliates are used to and will have no problems filling in.
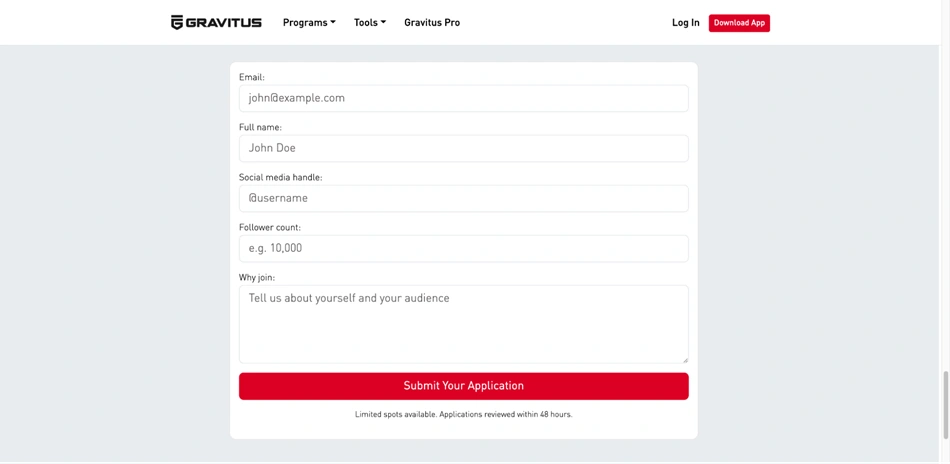
Less Common but Strategically Important Fields
Optional fields that can be valuable in specific cases – for example, you might want to know about the tax forms of your partners.
- Audience size or type (helpful for premium programs).
- Promotion method to filter out unwanted traffic sources.
- Country or region – tax, legal, or payout requirements.
- Short application message.
Only ask for information you actually plan to use, and that helps you make strategic modifications in your affiliate marketing program.
How What You Sell Shapes Your Affiliate Registration Form
A common misconception is that affiliate registration forms are mostly identical across websites.
In reality, take a look at different sites – they should vary significantly depending on what you sell and how affiliates are expected to promote it. Here are a few examples just to give you a brief idea.
1. Retail e-commerce (physical or digital products)
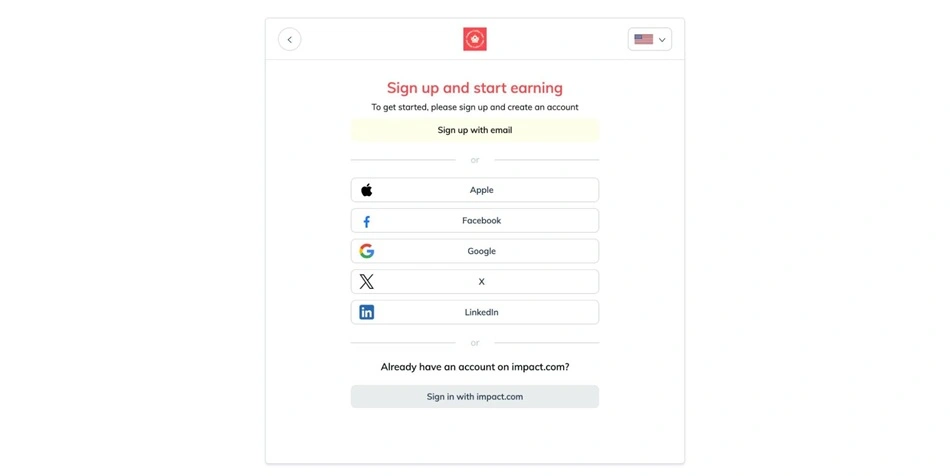
For online stores, the main goal is usually reach and scale; such sites really care about the volume of new registrations and want it to be attractive and fast.
If you run a site on plugins like WooCommerce, affiliates most likely promote your products through reviews, comparison posts, social media, or paid ads.
Typical affiliate registration forms for this scenario:
- Short and low-friction.
- Social login or login with a popular platform (e.g. Impact).
- Focused on contact and payout details.
- Minimal qualification questions.
Common fields:
- Name and email.
- Website or social media profile.
- Preferred payout method.
2. Coaching, consulting, or appointment-based services

If you work with services, meetings, and events, affiliates here are recommending you, not just a product. We can say that trust and brand alignment, as well as audience relevance matter much more.
Your affiliate registration form should help you understand:
- Who the affiliate’s audience is.
- How they plan to promote your services.
- Whether their positioning aligns with your brand.
Additional fields might include:
- Audience description.
- Promotion methods (email, content, referrals, ads).
- Experience promoting similar services.
3. Educational platforms, subscriptions, and classes

There is a slightly different story for online courses, memberships, or educational subscriptions; here, affiliates often act as educators or guides.
Useful fields may include:
- Niche or teaching background [text area field].
- Platform where they’ll promote (YouTube, blog, community).
- Geographic focus, which is important for language, pricing, or compliance [country or text area field].
The form must have dedicated fields for social media links and easy data collection for specific information.
Design and UX Best Practices for Affiliate Registration Forms
The following things will pretty much depend on your software and site design, but it’s important to know UX and UI principles that simplify interactions with your affiliate form even further.
- Logical field order (simple first, detailed later).
- Clear labels and helpful placeholders.
- Plain-language validation and error messages.
- Styling consistent with the rest of your site.
Psychologically, remember this: affiliates are evaluating your business while signing up. Clean, professional, fast forms make the registration process faster and easier.
How to Create an Affiliate Registration Form with AffiliatePress (Step by Step)
Now, let’s create an affiliate registration form for a WordPress site. AffiliatePress helps you do that, no matter which plugin you use for online commerce.
Before we jump to the steps, here is a full list of fields available in AffiliatePress:
- Text Field
- Textarea
- Checkbox
- Radio
- Dropdown
- Date Picker
- File Upload
Step 1: Enable affiliate registration

- Go to WordPress site > AffiliatePress > Settings > General.
- Find and enable “Allow Affiliate Registration.”
You’ve enabled users to register as affiliates on your site.
After registration, affiliates can be approved automatically or manually: Find Auto Approve & Activate New User Registration.
Your options include:
- Enabled – affiliates are approved instantly
- Disabled – registrations remain pending until manually approved
Here, decide who gets immediate access.
Step 2: Choose and customize registration form fields
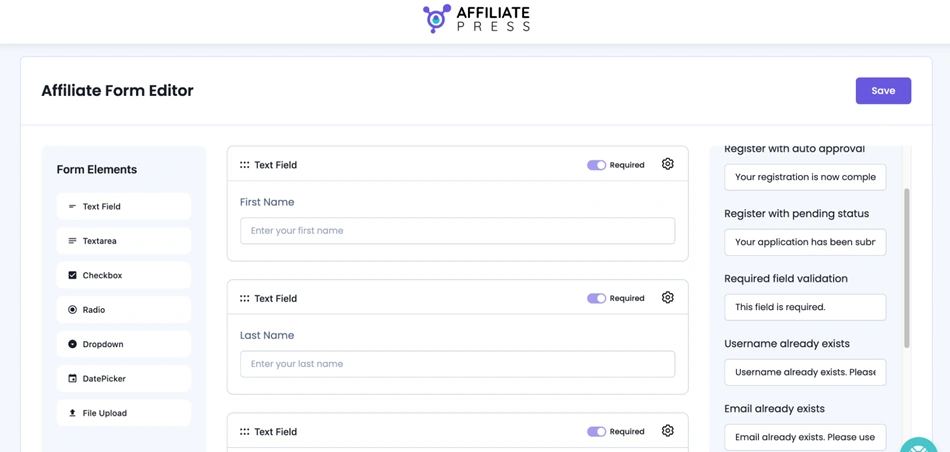
Next, it’s time to decide how the affiliate registration form should work on your site:
Go to AffiliatePress > Form Editor.
From here you can:
- Add or remove fields.
- Edit field labels and placeholders.
- Customize validation and error messages.
- Mark certain fields as required.
This is where you tailor the form to your business model and data needs.
Step 3: Add the affiliate registration form to your site
In WordPress, you can add a form to the page using various methods.
- Shortcode to place the form anywhere on your site.
Create or edit a WordPress page and insert: [affiliatepress_affiliate_registration]

- Elementor
AffiliatePress provides a dedicated widget, which you can drag and drop to the page in the opened Elementor builder. Use the Affiliate Registration Form widget.
Step 4: Set the registration page in AffiliatePress
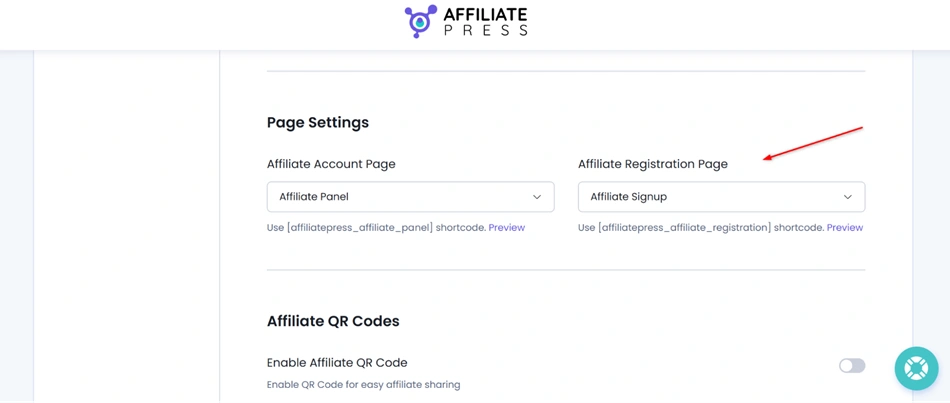
Now, let’s select that affiliate registration page via AffiliatePress > Settings > General.
Under Page Settings, select your page for Affiliate Registration Page.
Note – if you are working with it for the first time, the page might already be there, because when AffiliatePress is activated, two pages are created automatically:
- Affiliate Signup – registration form
- Affiliate Panel – affiliate dashboard
Step 5: Customize email notifications

AffiliatePress sends email notifications to both admins and affiliates, but you can also optionally customize them via AffiliatePress > Notifications.
Here you can:
- Enable or disable emails.
- Edit subject lines and message content.
- Use dynamic placeholders for personalization.
These are automated emails that keep communication clear during affiliate registration and approval.
Let’s Sum Up: Create a Professional Affiliate Registration Form with No Effort
What fields do you need for an affiliate registration form? Your business, affiliate management software, policies, and business strategies decide this. From a partner’s perspective, a well-designed affiliate registration form should be clear and easy to use. It reflects what you sell, how you work, and the kind of partners you want to attract.
It’s pretty much a technical setup step, but also the foundation of your affiliate ecosystem. And the better it is, the stronger affiliate partnerships you are going to have.
Related articles: