

How To Set Up Affiliate Program On WordPress (For Beginners)

Your WordPress site sells something, right? Looking to run an affiliate program for it and customize specific products as eligible for affiliate sales?
Our tutorial on adding an affiliate program to WordPress is perfectly suited then. With us, you are going to learn:
- What it takes to add an affiliate program to WordPress.
- Whether an affiliate program will work with your particular store or plugin.
- How to set up affiliate-wise or product-based commissions.
- Upload your promo assets and create tracking options.
- Customize payouts.
- Grow your sales!
As almost always in WordPress, you need a plugin to power your affiliate program! Begin with AffiliatePress, the only plugin you need to feel how easily affiliates can register and drive sales to your store.
We’ll be using it for our WordPress tutorial below. Since many of you out there use WooCommerce (and AffiliatePress works great with it), so we’ll be using it for our examples.
So, if you are looking for a tutorial on setting up affiliate programs for a WooCommerce store or any other e-commerce solution, let’s get started.
Step 1. Purchase or activate AffiliatePress for free
Start by purchasing AffiliatePress or, if you’re just exploring, install the free version: choose yours here.
Once installed and activated, if you are using a premium license, activate your license key to unlock many great features via the License menu in the plugin.
After activation, log into your AffiliatePress account to access and download any addons you’ll need. Addons extend the plugin’s core functionality, for example, more flexible commission types or more sophisticated tracking options.
Many users appreciate that AffiliatePress includes essential addons out of the box, where many other plugins charge extra.
Step 2. Run the setup wizard (optional, for quicker start)
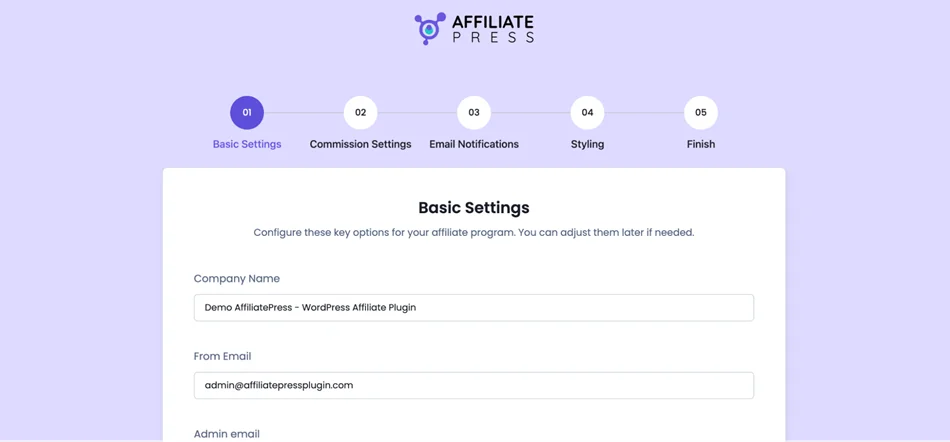
Next, launch the AffiliatePress Setup Wizard. This handy guided tool walks you through all the essentials of commission, payment, and other settings.
It’s a great time-saver, especially for first-time users or agencies setting up multiple affiliate sites. With the wizard, you’re ready to go live faster than with plugins that require manual setup for every detail.
Step 3. Follow the main configuration steps
To set the direction for your affiliate program when it comes to registrations to referral tracking, start with the main settings: AffiliatePress > Settings, then open the General tab.
So, what can you configure here?
1. Manage affiliate registrations
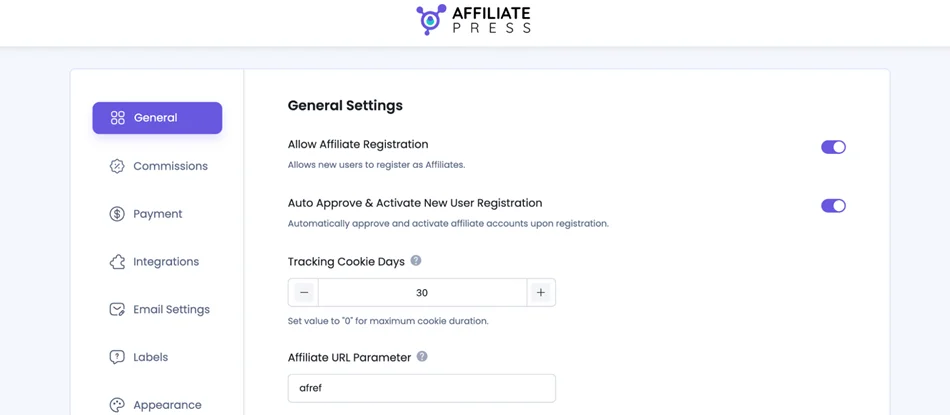
Turn on ‘affiliate registration’ to let users sign up as affiliates directly from your website. You will surely need this if you run online stores, SaaS tools, or courses to build a referral network organically.
You may optionally enable ‘Auto Active Upon Registration’ if you want affiliates to start promoting right away, with no manual check.
2. Set up tracking preferences
Choose how long the affiliate tracking cookie remains active. For example, setting it to 30 days means affiliates earn commissions for purchases made within a month of a referral click. May work for travel agencies or learning platforms where customers often take time before a purchase.
Here, you can also customize affiliate URL parameters and a default affiliate URL format. This adds flexibility depending on how you want to display (or obscure) affiliate data.
Another cool thing, AffiliatePress also allows you to enable ‘Fancy URLs’ to generate cleaner, professional-looking URLs, which are awesome for marketing and social sharing, especially for partners who want branded links.
3. Control affiliate account options

With these control settings, you can let affiliates request account closure directly from their dashboard and automatically turn new users into affiliates with auto-created accounts on user registration.
4. Configure currency settings
Select your preferred currency to fit your location and bank accounts.
5. Assign pages for affiliate actions
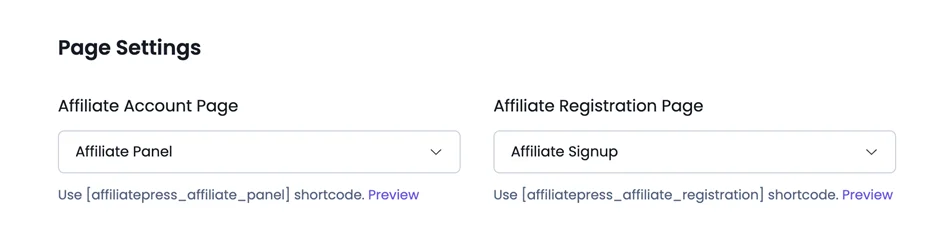
Choose the pages for key interactions:
- Affiliate panel
- Affiliate registration page
6. Optionally enable Captcha protection
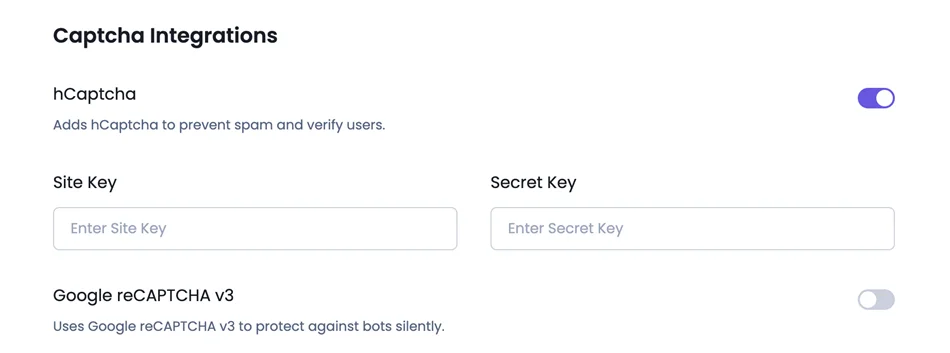
Protect your program from spam signups and bots using hCaptcha or Google reCAPTCHA. It’s a smooth process with the AffiliatePress plugin. Follow the steps in the plugin to get your tokens.
Enabling reCAPTCHA helps protect your site from fake affiliate signups, which is a must for larger programs or public campaigns.
Don’t forget to click Save Changes after updating any settings.
Step 4. Customize your commission settings

Commissions are crucial to how attractive your program is to potential affiliates. With the flexibility of AffiliatePress commission settings, you win all the loyalty and love!
To set up how commissions are calculated and paid in AffiliatePress, go to your WordPress dashboard > AffiliatePress > Settings > Commissions tab.
Here, you can set up everything from commission rates to payout cycles. Let’s highlight the key settings you need to go through:
- Commission Rate: Set a default % or fixed amount.
- Basis: Choose per product or per order.
- Self-Commissions: Let affiliates earn from their own purchases.
- Zero Commission: Track referrals without payout.
- Refund Grace: Delay payouts to match refund policy.
- Minimum Payout: Set a threshold before payout.
- Auto-Payout: Schedule payouts weekly, monthly, or yearly.
- Auto-Approve: Approve pending commissions after X days.
- Last Referrer: Credit the most recent affiliate link clicked.
When you need to set commissions for specific products, do that after the plugin of your choice is connected via Integrations, then use the product settings of your e-commerce plugin.
You might require additional superpower add-ons for more flexible commissions: View All AffiliatePress Commission types.
Step 5. Choose payment methods for payouts, manual or mass
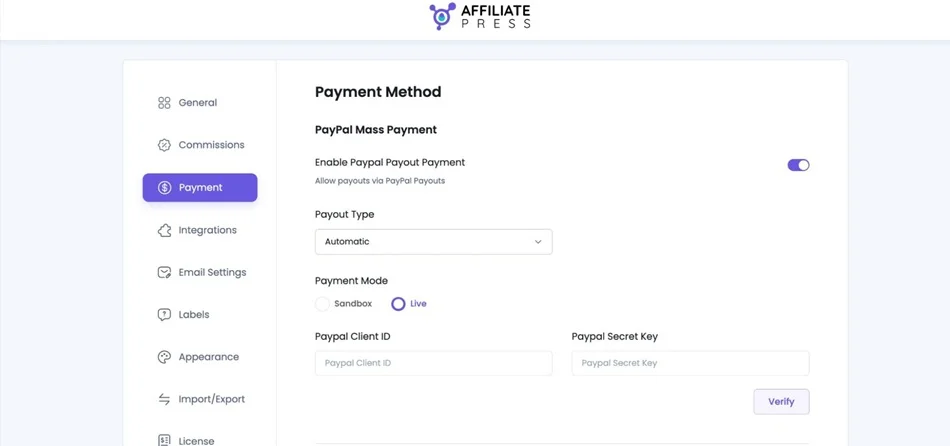
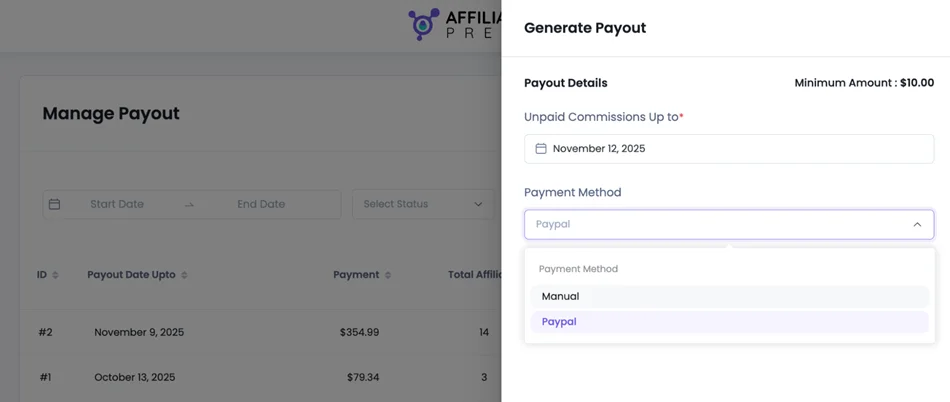
AffiliatePress allows you to make payouts to your affiliates using Stripe or PayPal. You can perform manual or mass payouts to save time once your program has involved many people and you need to optimize your resources.
In the Payment menu in Settings, you can enable the needed methods and connect them to your WordPress site using the required keys.
Once ready, you can work with your affiliates and make a payment easily:
Step 6. Select WordPress plugins to enable for affiliate program
AffiliatePress integrates with a huge number of WordPress plugins you use to sell products or subscriptions, some of the popular ones include:
- WooCommerce
- SureCart
- Easy Digital Downloads
- WP EasyCart
- ARMember
- MemberPress
- Paid Memberships Pro
- Ultimate Membership Pro
- LearnDash
- LifterLMS
- Masteriyo LMS
- View All
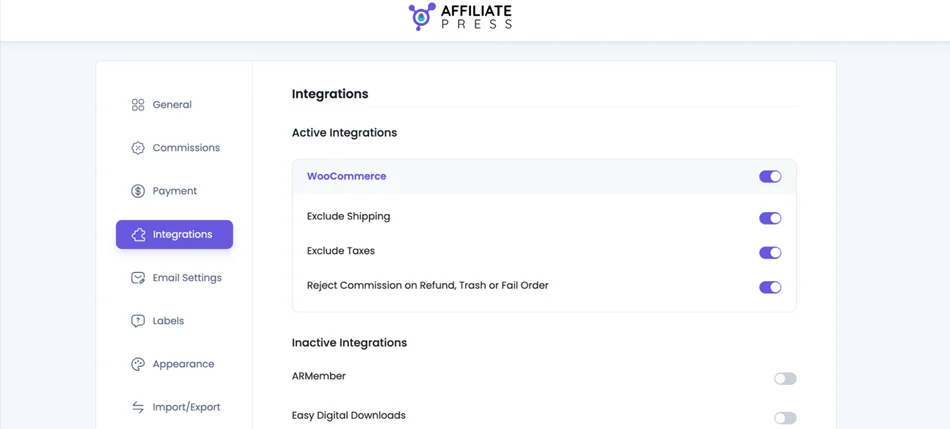
Navigate to the Integrations menu in the General settings to connect the plugins that you want to use, enable them, and customize the settings.
If you were using other affiliate WordPress plugins before, use the Improt/Export tab in the settings to quickly switch your data.
Step 7. Customize email settings and notifications
In the General Settings > Emails, you can set how your email should be sent, while in the AffiliatePress > Notifications, customize the exact content for automated emails.
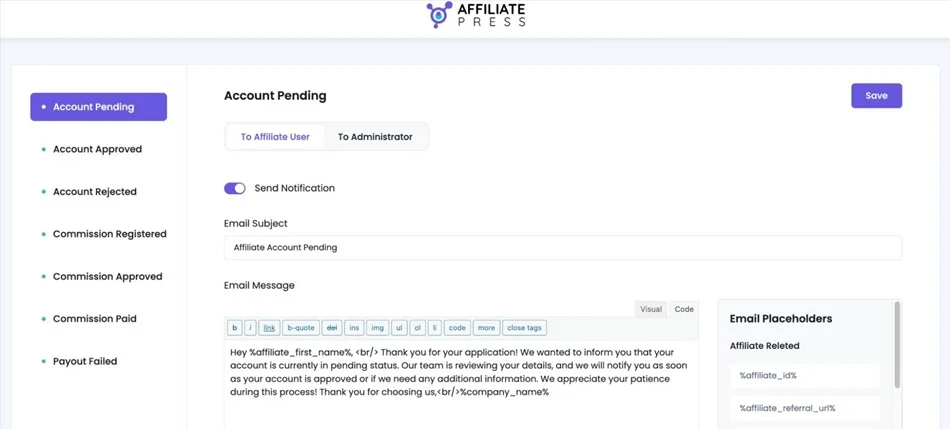
You can customize and send them to customers as well as yourself. Email notifications can be sent on key actions like account registration, approval, paid commissions, etc.
All is super automated!
Step 8. Brand your affiliate program texts
To better suit the context of your affiliate program, customize the labels of the AffiliatePress plugin for the affiliate panel, dashabord, etc.
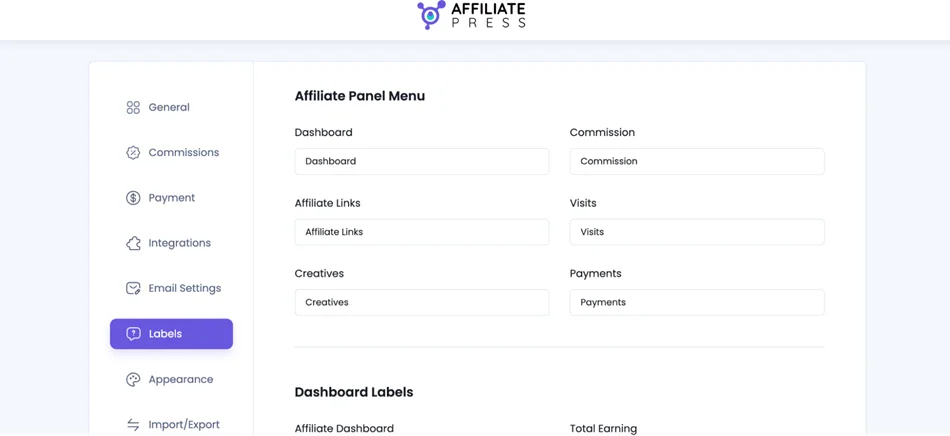
In the Appearance menu in the plugin settings, you can also go further and customize the color and font for your site design.

Step 9. Create affiliate groups
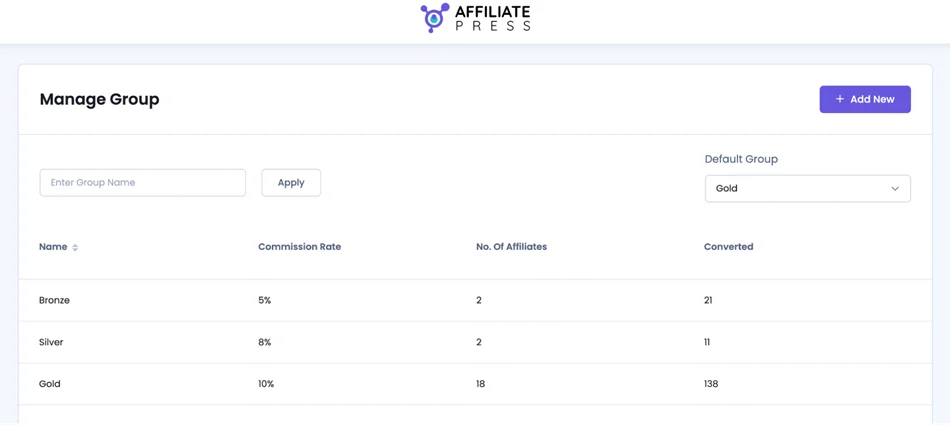
Affiliate groups in AffiliatePress let you organize affiliates and set custom commission rates for different partners. To get started, head to your AffiliatePress > Groups.
To add a group, click Add New, name it, and enable a custom rate if needed.
Groups in affiliate marketing make it easy to reward top affiliates, segment your network, and manage commissions more effectively.
Step 10. Upload creative assets for affiliate marketing
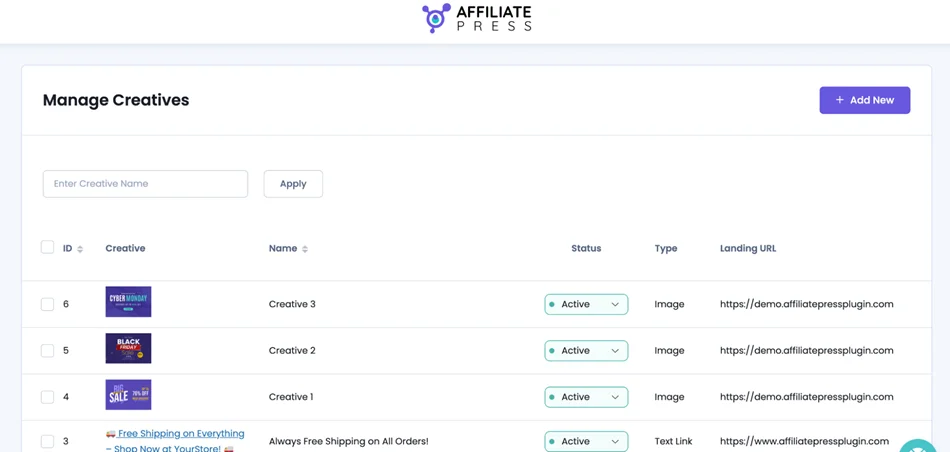
AffiliatePress lets you create and manage marketing creatives like images, banners, and text links that your affiliates can use to promote your products. Why do that?
- Provides affiliates with ready-to-use promotional materials.
- Keep your message up-to-date with branded materials.
- Simplify your work with easily uploadable and manageable assets across your site.
To add a creative media, go to AffiliatePress > Creatives. Your settings include:
- Name: Visible to affiliates.
- Description: Optional info displayed above the creative.
- Type: Image, text link, etc.
- Creative Image & Alt Text: If using an image.
- Landing URL: Where the creative links.
- Status: Active or Inactive.
You may use the shortcode from the creative to display it on any WordPress page for affiliates.
Step 11. Add affiliate registration forms to WordPress
How to add affiliate registration forms to WordPress with AffiliatePress? Firstly, customize the layout and settings via the Form Editor menu, which you can locate from the main plugin menu.
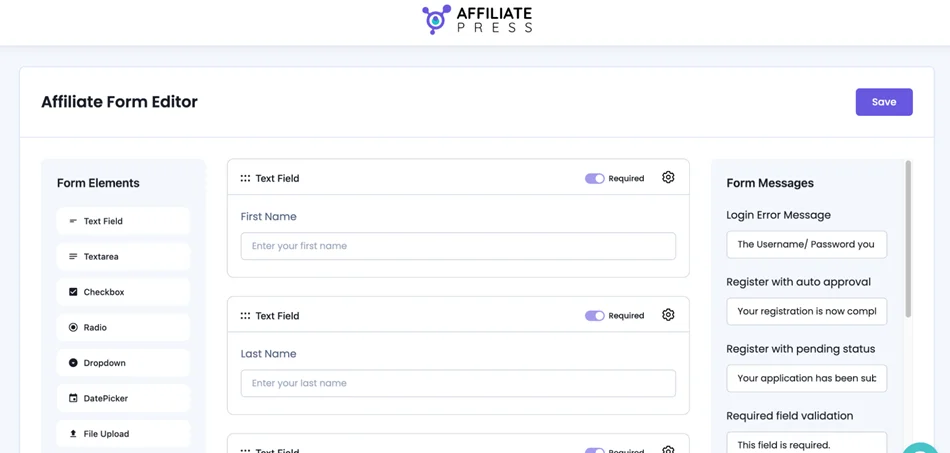
It lets you customize affiliate registration and profile forms in AffiliatePress. You can add, edit, reorder, or hide fields to fit your program’s needs.
The editor gives you full control over the information you collect from affiliates for a better user experience and program management.
To add the needed registration/login pages to WordPress, use dedicated AffiliatePress WordPress blocks or shortcodes – simply insert them to the needed page. If you use shortcodes, here are the key ones:
- Affiliate Dashboard – Shows the affiliate dashboard with referral link, stats, and account options.
- Affiliate Registration – Displays the affiliate signup form.
- Creative – Displays a specific promo asset by its ID.
Step 12. Manage your affiliate program on WordPress
AffiliatePress is your command dashboard when you need to track all the visits, clicks, affiliates and how well you are performing. There is a menu, settings, and stats for every case, where you can get data and make your decisions.
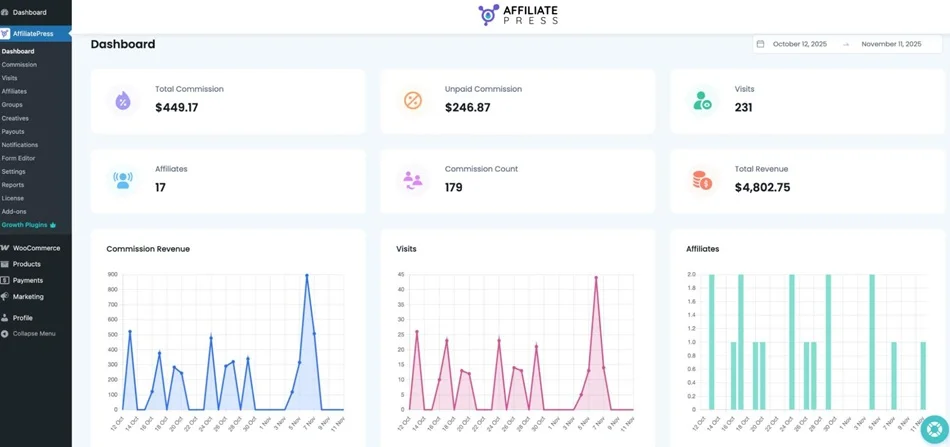
You can also use the Reports menu for more detailed statements of your program and performance.
Your affiliate program on WordPress is ready!
Concluding: Set Up Affiliate Program On WordPress
Ready to maximize your profits from online sales? Configure the key settings and AffiliatePress is ready to power your smooth affiliate onboarding and accurate referral tracking on WordPress.
So, no matter whether you are a store, a content subscription, or a service booking site, these options give you flexibility, automation, and control over your affiliate program.
Related articles: